UR Courses has a number of resources and activities that your instructor may use within your course. Over the coming months, we'll be working to improve our documentation and producing new guides. If you have something to add to our Frequently Asked Questions area, please contact ctl.support@uregina.ca.
Student Guide
Note to students: The activities and resources mentioned below are listed here for reference purposes. Your instructor(s) may only be using a selection of them within your course.
For a listing of information and contacts for additional support, please refer to the Student Support page.
Introduction
UR Courses is the online learning environment (OLE) used by the University of Regina and it’s Federated Colleges. This web based application offers a safe and secure environment where students are able to access course materials & activities posted by instructors.
Your UR Courses account is linked to your uregina.ca email account and is automated based on registration. If you add or drop a course, it will be updated within UR Courses approximately 24 hours later.
A growing number of instructors, but not all, use UR Courses in association with their course delivery. If you do not see a course listed, make sure to inquire with your instructor.
Location
UR Courses can be accessed from the top menu of the University’s website, or by navigating directly to https://urcourses.uregina.ca.
Username & Password
You will need to know your username & password before you are able to login. There is an online form to assist finding this information. You can also reset your password if necessary. If you have any trouble gaining access, please call the Service Desk at 306-585-4685 or email Service.Desk@uregina.ca.
Profile Settings
Once you have successfully logged in, you should take a few minutes to set up your profile by following the steps below.
- Login to UR Courses.
-
Locate the Administration block, expand My profile settings and choose Edit profile.

-
In the General section of your profile page, set the Email digest type, Forum auto-subscribe, & Forum tracking settings to your preference. Note: These settings affect all of your courses.

- Find the User picture area.
-
Browse for a file by clicking the file icon (highlighted), or drag and drop a picture into the box with the big blue arrow.

-
Once you have finished making the deisred changes, choose Update profile at page bottom to save your changes.

Technical Requirements
Minimum Browser Requirements
- Google Chrome recent versions
- Safari 6 or newer
- Firefox recent versions
- Internet Explorer 9* or newer
Additional browsers may work, but are not supported or tested
Note: If using Internet Explorer, Internet Explorer 10 or newer is required in order to drag and drop files from outside the browser into your course.
Pop-up blockers
In certain instances, UR Courses may not function properly if your browser isn't configured to allow pop-ups from https://urcourses.uregina.ca, and other sites that may be linked to from within your course.
For more information on configuring pop-ups for UR Courses, refer to the configuration screencast or overview for your browser.
Watch the screencast or follow the steps as outlined below.
Overview
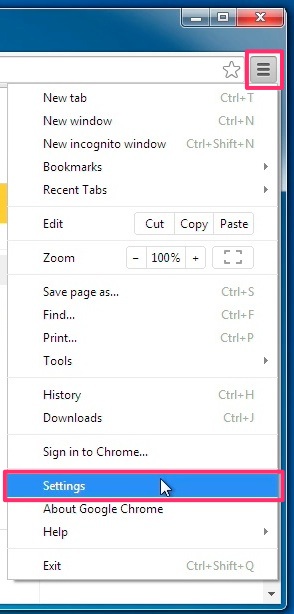
Click on the Chrome menu on the browser toolbar and select Settings.
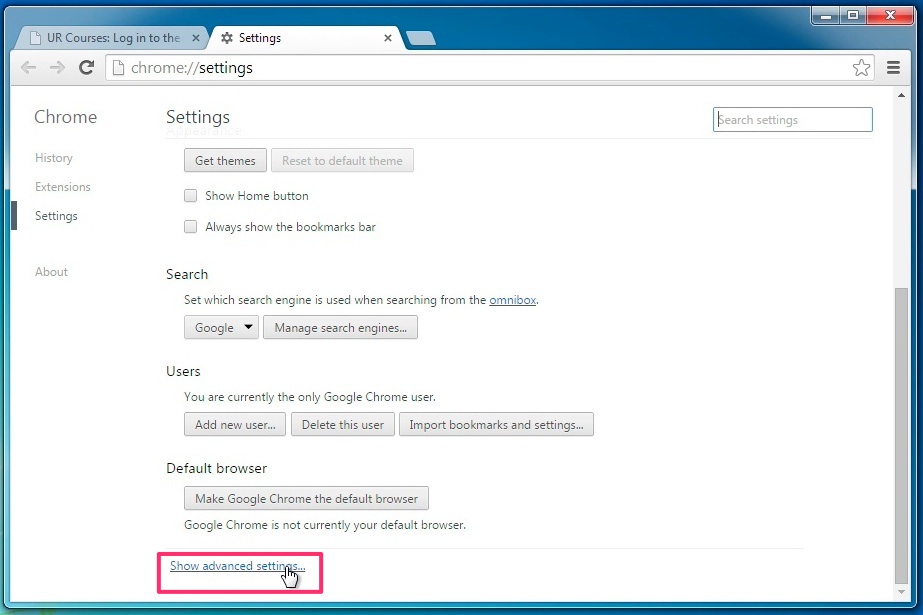
Scroll down to the bottom of the page and select Show advanced settings.
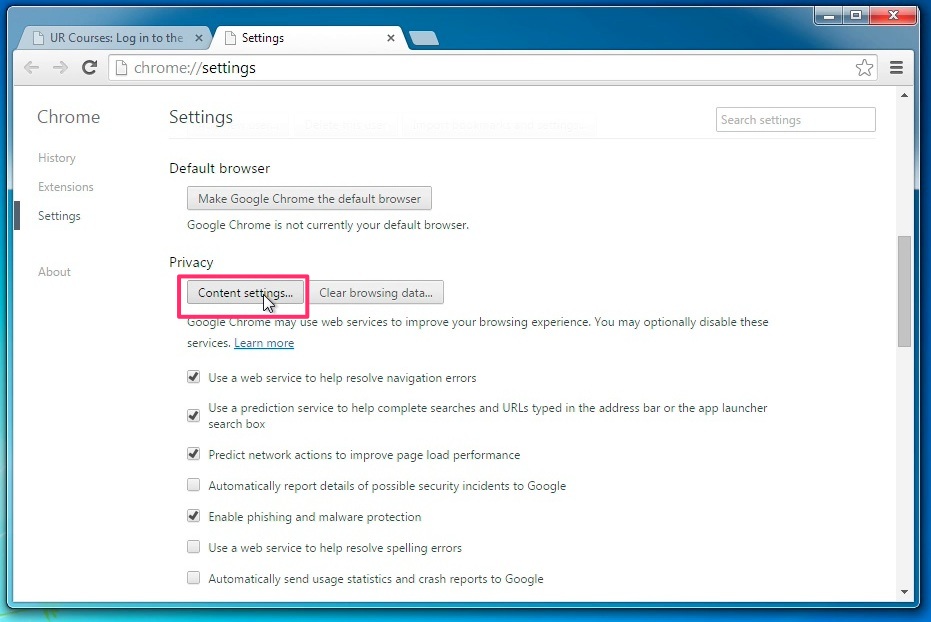
Within the Privacy section, select the Content settings button.
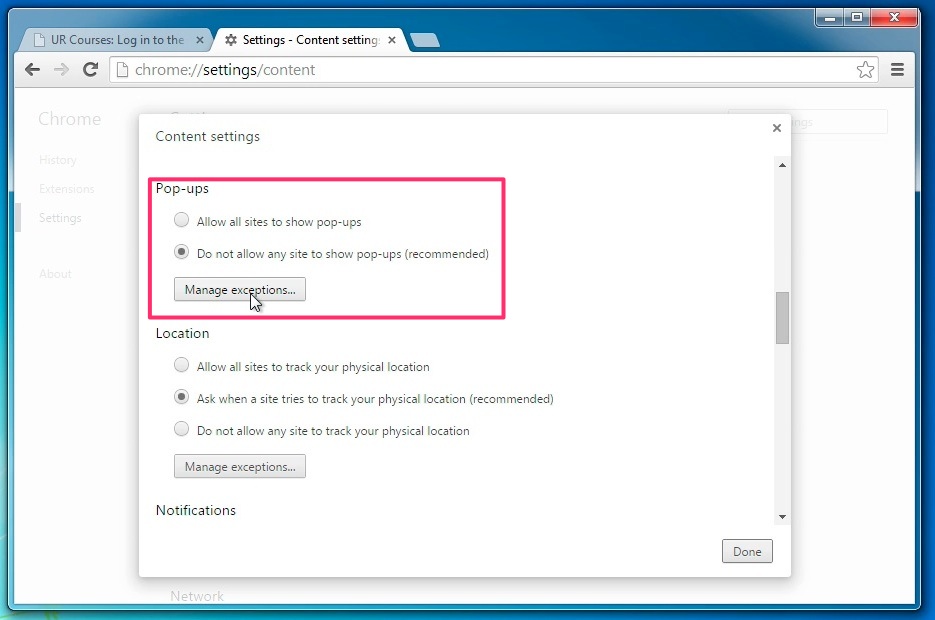
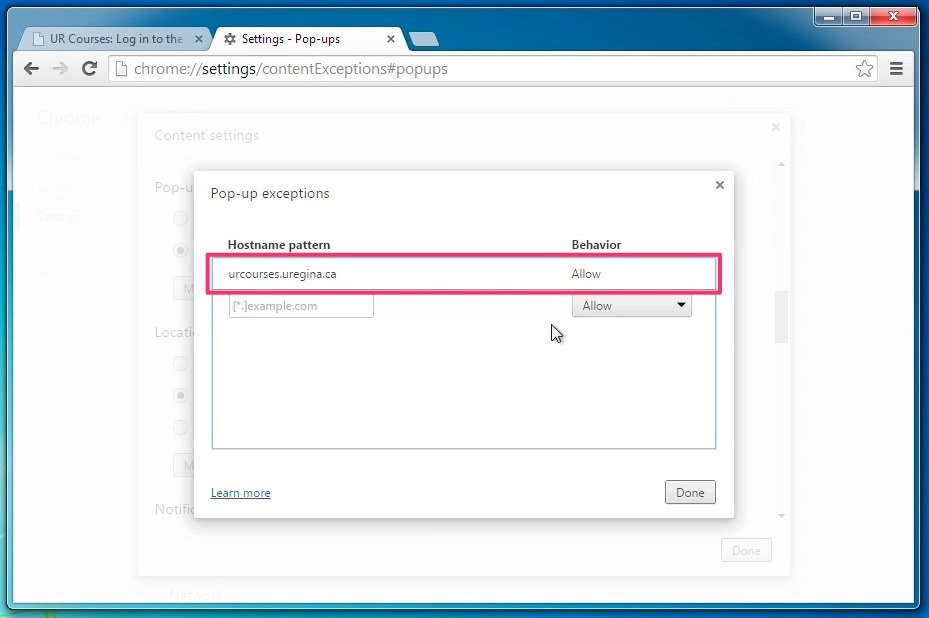
Within the Pop-ups section, select Allow all sites to show pop-ups or Manage exceptions.
On the Manage exceptions page, enter urcourses.uregina.ca.
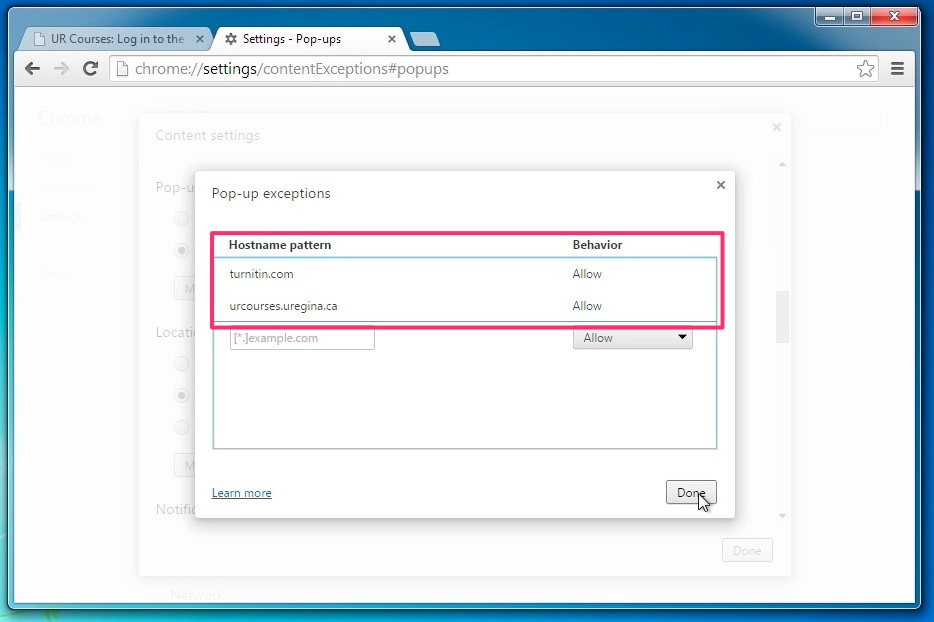
If your course uses the Turnitin integration within UR Courses, you should also add Turnitin.com to the exception list.
Close all of the settings windows by clicking Done and return to browsing.
Watch the screencast or follow the steps as outlined below.
Screencast — Mac
Overview
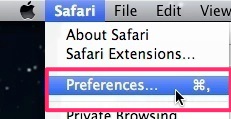
Open the Safari menu and select Preferences.
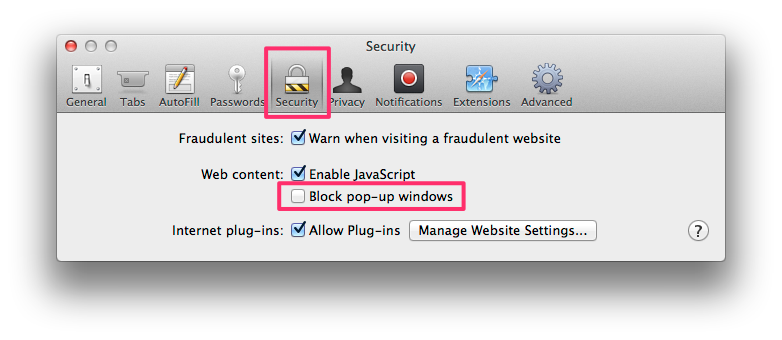
Navigate to the Security tab and ensure that Block pop-up windows is not checked.
Close the preferences menu and return to browsing.
Watch the screencast or follow the steps as outlined below.
Overview
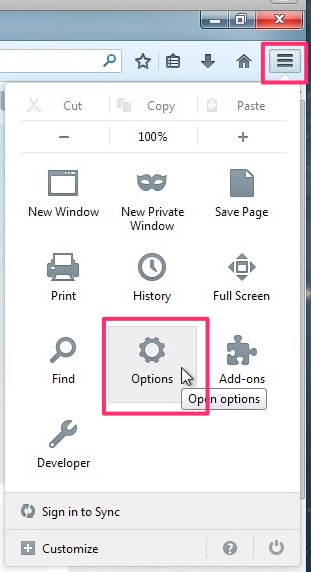
Open the Firefox menu from within the browser toolbar area and select Options.
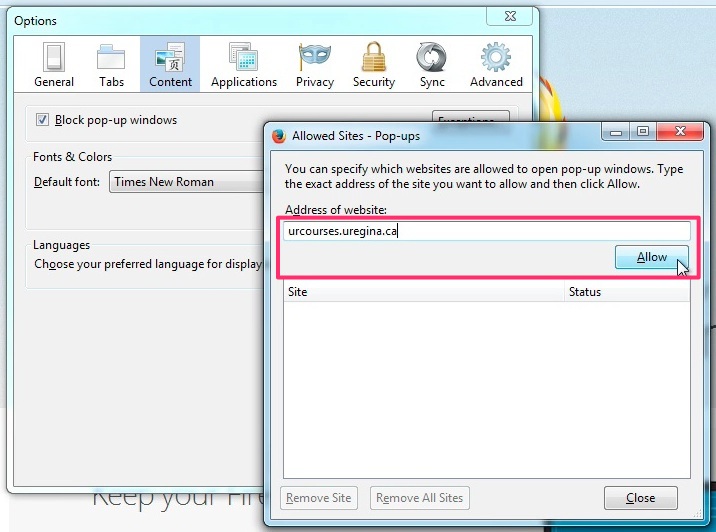
Navigate to the Content tab and be sure Block pop-up windows is not checked, or select the Exceptions... button.
Enter urcourses.uregina.ca into the Address of website field and click Allow.
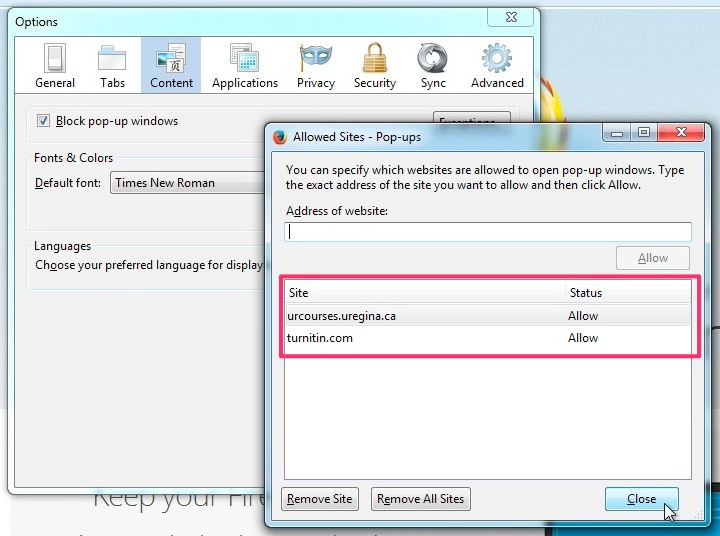
If your course uses the Turnitin integration within UR Courses, you should also add Turnitin.com to the Allowed Sites list.
Close the Options windows and return to browsing.
Watch the screencast or follow the steps as outlined below.
Screencast — Win
Overview
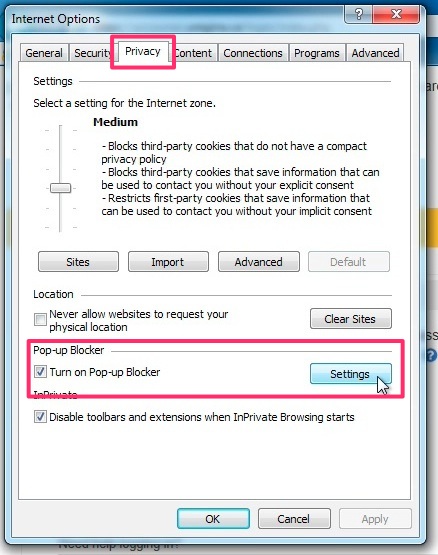
Open the Settings menu found in the browser toolbar area and select Internet options.
Within the Internet options window, select the Privacy tab and ensure Turn on Pop-up Blocker is not checked, or click on the Settings button.
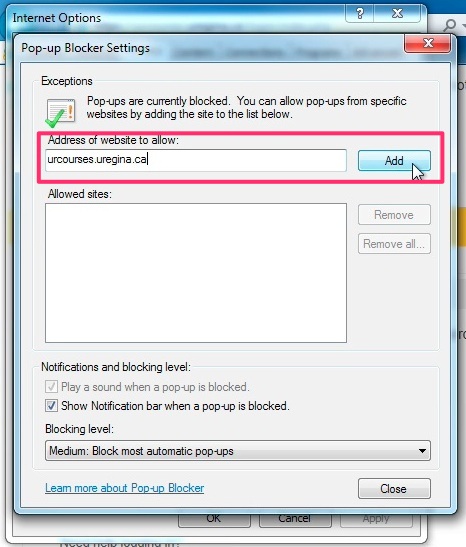
Enter urcourses.uregina.ca into the Address of website to allow field and click the Add button.
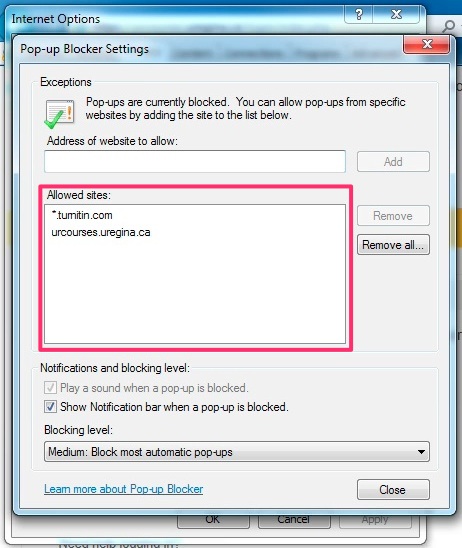
If your course uses the Turnitin integration within UR Courses, you should also add Turnitin.com to the Allowed Sites list.
Close the Internet Options windows and return to browsing.


Mixed Content
UR Courses is accessed through the more secure https protocol, as opposed to http. In certain instances, a course may have content embedded from another source that is not secure, and uses the http protocol. Modern browsers may suppress this content and display a notification regarding “Mixed Content”. To allow the content to display, follow the appropriate steps for your browser as outlined below.
Click on the Shield icon located within the address bar, and then click Load unsafe script
At the time of writing, Safari does not block mixed content.
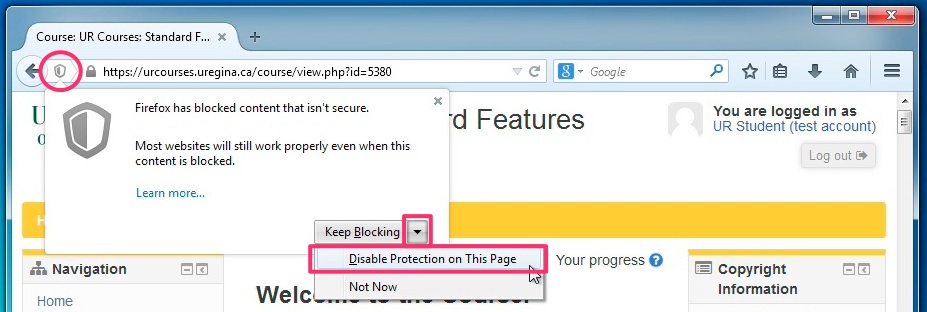
Click on the Shield icon located within the address bar, then click the arrow next to Keep blocking, and finally select Disable Protection on This Page
Click the Show all content button that appears at the bottom of the browser window


Mobile browser support
Any device that supports the minimum or comparable browser requirements and has an internet connection can be used to access content on UR Courses.
It is not recommended or necessarily possible to take exams or submit assignments from a mobile device.
Navigation
Once you’ve logged in to UR Courses, a list of the courses you are currently enrolled in should appear. Click on a course title link to enter the desired course.
If you have no courses currently available in UR Courses but believe you should, contact your instructor to confirm they are using UR Courses and have established a course site for the current semester. If you find you are still missing access to one of your courses, contact Service.Desk@uregina.ca.
Notifications
Users can receive message alerts for a number of different reasons and can also send and receive instant messages. How a user receives notification of incoming messages can be set by locating the Administration block, then expand My profile settings, and finally click Messaging.
This brings up a screen with check boxes where users can choose how they wish to be notified both when logged in and logged out. They can choose between a pop up or an email by selecting the appropriate checkboxes.
Pop Up
When a user is logged into Moodle, the message will pop up from the bottom right corner of the page. The user can choose to read the message immediately or to ignore it. If they choose to ignore it, the message remains until it is read.
If a user is offline, all notifications will be sent to the student’s @uregina.ca email account.
Course Email
When you login to UR Courses, your UR Courses page will show an email icon for each one of your courses, if you have something in your inbox for that course. If you see an email icon for a course, go into that course right away and check your inbox.
Email sent by students and instructors using the course mail tool stay within the course, (as these messages are not sent to your URegina email account) so an important habit is to check your UR Courses email on a daily basis. The mail tool works like most email programs and has an Inbox, Sent, and Trash as well as a New Message, Manage Folders and Email Notification icons to use.
To Send a Course Email
- Login and select your course title
- Click on the Email link in the Activities block
- Select New Message
- Select an addressee from the Participants list, (use CTRL or SHIFT to select more than one addressee), then click on the left pointing arrow
- Enter Subject line, and type message in the HTML message box
- You can also Browse for attachments (up to 16MB) in one of two ways: 1) drag and drop the file into the file area or 2) click "Choose a file...”, click the Browse button to choose file to attach then "Open", then click the “Upload this file” button”. Repeat for each additional file to be attached. Don't be shy, email your instructor if you have questions.
- Finally, click Send
Receiving Course Email Notifications
Students can choose whether or not they want to receive course email notifcations at their @uregina.ca email address. Currently the default is to have notification turned off. To turn notification on:
- Enter the Course email tool and click on the Email notification link.
-
Select the Notify me... option.
NOTE: You will have to change this for every course you are enrolled in.
Forwarding Email
Students can forward all UR Courses email to their @uregina.ca email account. To do this:
- Click on the Course Email link in UR Courses
- Click on the Email Notification link
- Choose the option Notify me by email...
- Click Save my preference
Screencast
Forums
Forums are online message boards, where you, your classmates, and your instructor can post messages to each other at any time.
There are five different types of forums that may be used in your course. Each one depends on the intended communication goal. These five are:
- A single simple discussion - A single discussion topic which everyone can reply to.
- Each person posts one discussion - Each student can post exactly one new discussion topic, which everyone can then reply to.
- Q and A forum - Students must first post their perspectives before viewing other students' posts.
- Standard forum displayed in a blog-like format - An open forum where anyone can start a new discussion at any time, and in which discussion topics are displayed on one page with "Discuss this topic" links.
- Standard forum for general use - An open forum where anyone can start a new discussion at any time by clicking the “Add a new discussion topic” button.
Depending on how your instructor has set up the forum, you may be able to post a new discussion message, or you may only be able to reply to the message that the instructor posted.
News/Announcements Forum
Some courses may not use forums at all, while other courses may use many forums. Most courses will have a News/Announcements forum. Only the instructor can post to this forum, and students cannot reply. By default every time a message is posted to this forum an email will be sent to your @uregina.ca email.
Note: In fully online courses at the U of R, all correspondence regarding invigilated final exams will be sent to students through this forum.
In a university-level course, we encourage students to dialogue critically. You may wish to challenge points made by others in a forum posting; make sure that you provide evidence to support your argument(s). Just stating that you (dis)agree with a certain statement is not a contribution to the discussion. Instead, you might say “I (dis)agree because...”.
Please be advised that appropriate rules for classroom communication apply in online environments as well. Please see the Academic Calendar at (http://www.uregina.ca/gencal/ugcal/attendanceEvaluation/ugcal_79.shtml, Section 5.13.3.1) for acceptable student behavior.
Tracking Unread Messages
Each student has the option of turning the tracking on or off for a particular forum. When tracking is turned on all unread posts are indicated with a green checkmark next to the forum/discussion name in the main forum page. To access these new posts, click the number next to the green checkmark, not the green checkmark itself as this will mark all new postings in the forum as read even though they have not been read. All new postings in each forum have a dark blue border around them. If you do not see this dark black border around new messages or you are not seeing any new posts in the unread posts column, please do the following.
- In the Administration block, click My Profile Settings
- Click Edit profile
- Next to Forum tracking, click "Yes, highlight new posts for me"
- Click the Update profile button at the bottom of the page.
Once you have clicked on the message to read it, the number of new unread posts decreases when you go back to main forum page.
Note: You can turn tracking on and off by clicking Forums in the Activity block. Under the Tracking column you will see Yes and/or No beside each forum. To turn tracking on for a particular forum click the button next to the forum until the button says “Yes”; for “No” click until the button says No.
Subscribing and Unsubscribing to a Forum
Depending on how each forum is set up by the instructor, students may have the option of subscribing to all or individual forums with the exception of the News/Announcements Forum, where students are automatically subscribed for the duration of the course. This means that they will receive an email (@uregina.ca as listed in their profile) each time a posting is made to the forum. This is why it is crucial that students check their @uregina.ca email regularly. Once the email is received, students can reply to the message from the email or by replying in the course. Replies will appear as a posting in the forum. To Unsubscribe to email from a forum either click "Unsubscribe" in the email itself or, in the upper right corner of the forum, click "Unsubscribe from all forums."
Note: You can turn subscriptions on and off by clicking Forums in the Activity block. Under the Subscribed column you will see Yes and/or No beside each forum. To turn subscriptions on for a particular forum click the button next to the forum until the button says “Yes”; for “No” click until the button says No.
Note: If you are subscribe to a forum via email or receive a digest of forum activity, UR Courses will mark the forum postings listed in the email as read (even though you may not have actually read the email).
Choosing How Forum Posts are Displayed
Users have the choice of how their forum posts are displayed (e.g. nested, flat). Click on a Forum and then a discussion name. The default is to have all reply posts in a discussion to be nested (indented further than the original post). This is probably the preferable format for most people. To change the view click the “Display replies in nested form” drop down list. Choose another view from the list: 1) Displays replies flat, with oldest first; 2) Displays replies flat, with newest first; and 3) Displays replies in nested form. Fool around with these other views to see which one you like the best.
Group Forums
Many courses may require students to use a forum to work in groups. There are 2 types of group forums: 1) separate groups and 2) visible groups:
Separate groups
Separate groups are private, meaning only members of a group can post new discussion topics and read each other's postings within the group; you will not have access to any other group. In order to post to this forum, you must:
- Click on the drop down menu beside "Separate Groups;" a list of groups will appear for which you are a member.
- To start a new discussion, click on your group from this drop-down list. Depending on what type of forum was selected (see types of forums above), a new button may appear in the middle of your page called "Add a New Discussion Topic." This will start a new discussion thread.
- To reply to an existing discussion click on another group member's discussion post and then click "reply."
Visible groups
Visible groups, on the other hand, are both private and public. This means that only group members can post a new discussion topic within the group, but all class members can read postings of other groups. Students can see other groups' postings by clicking the Group name from the drop down list next to Visible Groups.

Note: You can turn subscriptions on and off by clicking Forums in the Activity block. Under the Subscribed column you will see Yes and/or No beside each forum. To turn subscriptions on for a particular forum click the button next to the forum until the button says “Yes”; for “No” click until the button says No.
If you try replying to a forum post but you don't see a reply button, you are likely not a part of the group it was posted to.
To Use a Forum
- Login and select the course title
- Go to the Topic or Week section in which the forum exists, and click on the name of the Forum or click Forums in the Activities block and select the forum name.
- To read a posting, click on a discussion that someone else has posted.
- To reply to a discussion that someone else has posted, click “Reply” in the message
- To start a new discussion (if available in the forum), click the "Add a new discussion topic" button. This will start a new thread.
Assignments
The Assignment tool allows instructors to collect work from students. Students can submit files (example: word-processed documents, images, or other file types), type text directly in the text editor online, or a combination of both! Instructors can also leave feedback, fill out a rubric, or upload a response file when grading.
Submitting a file-based assignment
- Click on the Assignment link.
- Details about the specific assignment such as submission status, grade status, due date, and time remaining will be listed.
- Click on the ‘Add submission’ button.
-
You can add your submission by dragging and dropping the file onto the box with the big blue arrow,
OR
You can add your submission by using the upload menu within the file picker.
- Select the + Add button within the File submission box.
- Select the ‘Browse’ button and select your file
- Click the ‘Upload this file’ button
- All files browsed and dropped in the File submission box will appear
- Select the ‘Save changes’ button to complete your submission

Submitting an online text assignment
In some cases, you will be asked to type directly into UR Courses to complete an online assignment.
- Click on the Assignment link.
- Details about the specific assignment such as submission status, grade status, due date, and time remaining will be listed.
- Click on the ‘Add submission’ button.
- In the Online text, editor box, type as you normally would in a word-processing program.

Note: click on the button at the top left corner of the text box to expand the toolbar for additional formatting options (see right).
- Format icons are located at the top if you would like to bold, italicize, number, bullet, or add a hyperlink.
- When finished, select the ‘Save changes’ button.
Note: In some cases you may be asked to complete an online text area AND submit a file. Please read your assignment instructions carefully to be certain.
Initial rich text area with the minimal toolbar.

Expanded rich text area toolbar.

Submitting a Turnitin assignment
A Turnitin assignment activity is available within UR Courses that allows students and instructors to interact with Turnitin.com directly from within their course.
Students can submit files (example: word-processed documents or other file types) or type text directly in the text editor online, depending on the assignments configuration.
- Click on the Assignment link.
- Details about the specific assignment such as submission status, grade status, due date, and time remaining will be listed.
- Click on the Submit Paper link.
- Select the submission type from the dropdown menu if available.
- Provide a name for your submission and either attach a file or enter content into the text area.
- Click Add submission once you are ready to submit.
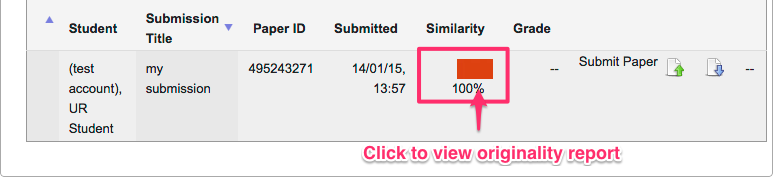
- If your instructor has allowed students to view their originality report, you can access it by clicking on the Similarity result. You may need to refresh the page if Turnitin takes longer than usual to generate the report.
Screencast
The following screencast is an overview of working with the Assignment (Turnitin) activity within your course.
Rubrics
What is a rubric? A rubric is a popular way for instructors to communicate expectations for an assignment. Some instructor may provide a simple rubric within the course outline or they may include a rubric within the Assignment tool. The rubric outlines what you need to do in order to achieve the marks you want. The following is an example of a simple rubric:
|
1 point |
2 points |
3 points |
|
|---|---|---|---|
|
Use of language |
very basic writing |
some errors but fairly accurate |
high level of accuracy |
|
Relevance of content |
none of the required points covered |
some points covered, but has some irrelevance |
most content is covered |
|
Appropriateness of style. |
style not appropriate |
fairly good style |
very appropriate style |
If an instructor has decided to use a rubric in UR Courses and has made it available to students, it will be accessible through a link within the assignment activity itself.
Quizzes & Exams
The Quiz tool is an e-assessment tool. It could be used for short quizzes, major exams, or study purposes. Depending on it’s purpose the features will vary.
Before a Quiz
- Pay attention to the date, time limit, and number of attempts the quiz has. For example a quiz may be open from 8:00am to 8:00pm but has a time limit of 20 minutes. This adds tension.
- Some instructors provide a practice quiz. Always try this one first.
- Opt for a landline connect and do not depend on wireless for quizzes.
- Remember, all searched web pages you travel to within your course will be logged and recorded as you complete the exam. Don’t wander.
- Try to find a quiet location without distraction or interruptions so the time limit is not wasted.
Taking a Quiz
- Click on the quiz link
- Select the ‘Attempt quiz now’ button
- Sometimes, there will be a pop-up window indicating a time limit - select the ‘Start attempt’ button to start clock count down.
- Answer each question. This can be done by using the ‘Quiz navigation’ or by using the ’Next’ button at page bottom.
- The ‘Quiz navigation’ box in the upper left-corner includes:
- links to each question
- the ‘Finish attempt’ link to close & lock the quiz
- the ‘Time left’ countdown clock
Note: Instructors can force questions to be answered in sequential order, which disables your ability to move back and forth between questions when configured this way.

- Students may also select the ‘Flag question’ icon to visually add a red flag, which makes it easier to return to the question before finishing, time permitting.
- Save answers as you go, in case you lose connection.
- When you are finished there will be a ‘Finish attempt’ link in the ‘Quiz navigation’ box which locks your answers.
Questions Types
There are several types of questions which could appear in quizzes. The most common are:
- Multiple choice
- Essay
- Matching
- Short answer
- True/False
Saving the Quiz
Quizzes can be set up two ways, which has an impact on saving & completing the quiz.
- Sequential navigation forces students to answer questions in order. Selecting the ‘Next’ button at the page bottom saves & locks the page and takes you to the next page. (Example: Question 1, Question 2, Question 3, and so on). It disables moving backward within the quiz. When on the last page of the quiz use the ‘Finish attempt’ link in the ‘Quiz navigation’ box to complete the quiz.
- Free navigation allows you to bounce around and complete the quiz in no particular order! (Example: Question 2, Question 30, then Question 13). When finished answering all questions, save using the ‘Finish attempt’ link in the ‘Quiz navigation’ box.
Checking Grades
- Click on the quiz link within your course
- In the ‘Review’ column you will see either ‘Not permitted’ or a ‘Review’ link.
- Click on the ‘Review’ link and the completed quiz will appear.
- To view scores, click on Grades in the Administration block.
- All grade items, including any quizzes the instructor has chosen to release will be listed.
Note: It is common for instructors to restrict the review options and only release marks within the course Grades area.
Books/Bookshelf
A book is a way to organize content and activities in a course by unit or topic or week. Books may be listed down the middle of the homepage and/or contained on a bookshelf near the top left or right. If books appear in both places they are the same, not different.
Note: Fully online courses use books extensively. Face-to-face courses with a UR Courses supplement most likely won’t be using books at all or not as extensively.
Wikis
The Wiki tool within UR Courses is a useful group work and collaboration activity. It allows students registered in the same course to work individually or together (in groups or as a class) to create documents such as a paper or project. All members of a group can work on the same wiki. It is possible to format wiki pages in a manner similar to other word processing software (i.e. Microsoft Word). It is also possible to create multiple wiki pages and link these pages together, as well as add pictures and links to uploaded files.
Accessing a Wiki
- Click on the Wikis link on the Activities block.
- Choose the wiki you want to open if more than one is available
Adding Text/Editing a Wiki
A wiki will usually display either a start page that is empty or a description area with text that has been inserted by the instructor with instructions or questions for students to answer. Below the description text there will be a number of tabs: view, edit, comments, history, map, and files. The View tab will be selected by default.
Below the tabs you will see a Separate groups or Visible groups box (similar to that found when using groups in Forums). If separate groups are used in the course you probably won’t be able to change the group unless you belong to more than one group. If the instructor has set the groups to visible then you will be able to see other groups and what they have written but you will only be able to edit your own group’s wiki. If you are not using group wikis then you won’t see a groups list at all.
Once you have selected your group (if applicable) you can click the Edit tab to edit the contents on your wiki page. When in edit mode a toolbar will appear and you will see a cursor allowing you to type/edit text as you wish.
Comments/History and Files Tabs
- The Comments tab allows you and your group (if this is a group wiki) to share comments between each other. Think of it as forum to post questions/comments pertaining to your wiki content. This is useful so your wiki does not get cluttered with content and comments.
- The History tab allows every change Saved made by all users to be recorded. So, if something accidently gets deleted users of a group can compare two different versions with each other and then restore an older version so it can become the master copy.
- The Files tab allows users to upload files to share with others in the group. Simply drag and drop the file from your computer to the files area. The file(s) get(s) saved with the wiki.
-
Exporting your wiki
Once the wiki activity is finished, the wiki text can be copied and pasted to a word processor and submitted for grading. Note: The wiki content will be deleted after the course has ended so you may also want to keep a copy as a backup or just to have for future reference.
Calendar
The Calendar tool displays Upcoming Events that are Global, Course, Group, or User related. Many of the items that appear in the Calendar appear automatically when an assignment or other activity that is date sensitive is created by the instructor. The calendar events are colour coded by category.
Note: The Calendar may not appear in your course if the instructor has opted not to use it. A general calendar including events from all of your courses is availble on the main course listing page.
The Calendar can be used to see at a glance all important forthcoming events at course level or by students to remind themselves of course deadlines. Students can create a user event for a course which is only seen by them in the Upcoming Events block.
To create a new Event
- Login and select your course title
- In Upcoming Events, select New Event (at the bottom of the Upcoming Events block)
- Enter New event details like Name, Description, Date, Repeats etc. Then select Save changes
- Your event will appear in the Upcoming Events block on the main course page that only you will see (highlighted in blue)
Screencast
Blogs
A Blog is a webpage, usually maintained by an individual, with regular entries of commentary, descriptions of events, or other material such as graphics or video. The blog is often used as a journaling tool.
To post in your blog
- In the Blog block on the homepage of your course, click Add an entry about this course NOT Add a new entry.
- Type a title for your post and some text in the Blog entry body.
- Attach any files you wish to attach by dragging and dropping files from your computer into the files area.
- Publish to.. Select Yourself or Anyone on this site
- Under Associations, make sure this course is checked. Otherwise the post will be able to be seen by anyone in any UR Course.
To view/edit or delete your post
- In the Blog block, click “View my entries about this course”
- Find the post you want to edit or delete
- Click on the Edit or Delete link in the post.
- If Editing, make changes and then click Save changes at bottom.
Screencast
Chat
The chat tool allows participants to have a real-time (LIVE) synchronous text-based discussion (no audio/video) via the web. This should not be confused with forums and email whose purpose is asynchronous or NOT real-time (NOT LIVE). Chat is a simple tool but has many uses including: collaborative discovery, online seminars, exam preparations, and study groups. It is especially useful for working out logistical issues of allocating roles and how to share the work within group projects.
To access chat
- Click Chats in the Activities block.
-
Click on the link Click here to enter the chat now to enter the chat room.
Note: If groups are enabled and you are a part of more than one group, select your desired group from the drop down list before trying to enter the chat. - After clicking the enter chat link, a new chat pop-up window should appear. If you don't see the chat window check to see that you have pop-up windows enabled. The pop-up window will be divided into two parts. Messages posted within the chat appear on the left side, and people online within the chat room are listed on the right. At the bottom you will find the message input field where you compose and send your messages.
- A history of each chat conversation can be saved and made available to students if the instructor has the chat configured in this manner. The instructor may view this history to check on what has been discussed if they were not present, or simply to refer back to at a later time.
Conventions and formatting
The following conventions and formatting are available within the Chat activity:
Emoticons
Emoticon conventions used elsewhere within UR Courses can be included in chat messages and will be displayed using a graphic equivalent where available.
Auto-linking
Internet addresses will be turned into clickable links automatically.
Emoting
You can start a line with /me or a colon : to emote. For example, if your name is Kim and you type :laughs! or /me laughs!, the message will appear within the Chat window as "Kim laughs!"
Beeps
You can send a sound to other people by hitting the "beep" link next to their name. A useful shortcut to beep all the people in the chat at once is to type beep all.
HTML
If you know some HTML code, you can use it in your text to do things like insert images, play sounds or create different coloured and sized text.
Messaging
The messaging tool is for sending instant messages, and is separate from course email.
Note: It is recommended to communicate with your instructor via course email and not by instant messaging unless otherwise stated by the instructor.
You can send a message to other students within the same course by doing the following:
- check to see if the student is online by looking at the Online Users block (if availble within your course)
- click on Participants
- click on the intended recipient’s name
- click the Send message button
- Compose your message and finally click Send. If the student is online, they will receive the message in an overlay at the bottom of the page and may respond. If they are not online, they may recieve a notification email at their uregina.ca email account (depending on their messaging notification preferences), but will otherwise only receieve the message the next time they login.
To adjust your messaging and notification preferences, go to Administration > My Profile Settings > Messaging)
Adobe Connect
Adobe Connect is a web-conferencing/meeting tool that offers text chat, audio, and video communications. This software can be used in a variety of ways: for dialogue exams in French, group presentations, teacher presenting material to students and then students commenting through audio and/or text chat. Adobe Connect can also be used for team discussions and presentations where there is no instructor present.
Adobe Connect requires you to download an Adobe Connect Add-in plugin once and then not again. After this software is installed you can simply click the Adobe Connect meeting room link provided to you in your course. You will also need a headset with a microphone if you are required by your instructor to communicate by voice.
Getting Started with Adobe Connect
- Become familiar with Adobe Connect Pro by going through the overview at http://www.adobe.com/products/acrobatconnectpro/demo
- Go to http://test.connect.edonline.sk.ca.
- The URL above will test four key areas; that you have a supported version of Flash installed, that you can connect to the Connect Pro server, a speed test to the Connect Pro server (and the equivalent speed result is displayed e.g. LAN speed) and that you have the Adobe-Connect add-in installed. If the addin is not installed please do so. This only has to be done once.
- With these tests complete (and any missing plugins installed, you are ready to log into your meeting. Remember that you will need supported versions of both the Flash and Adobe-Connect plugins installed. The test URL listed above will verify the necessary plugins for you (and provide links to download them if they are missing from your computer).
- Check out the Adobe Connect environment - Enter the URCourses practice course adobe room here. (Enter as a guest, type your name, and select the 'Enter Room' button). NOTE: You may be asked to install an Adobe Connect add-in software. Please do so. This only has to be done once. Try raising your hand, sharing your screen, writing a note.
- To test your audio (Note: You will not be able to test your audio in the practice room only your course meeting room where an instructor is present.)
- make sure your headset is connected to the computer (note: a headset with a mic works better than a webcam with built in mic)
- click the meeting menu, click Audio Setup Wizard.
- go through all 5 steps to make sure your microphone and speakers work.
-
To test your audio, press the Microphone button on the toolbar
at the top of the screen. The button will turn green when turned on. Say a few words and you should see sound coming out of the microphone icon. If you don’t see sound redo step 4b above. To stop talking click the microphone button again and a line will appear through the mic icon. There will have to be someone else in the room for you to get a true sense of whether your audio works or not. Maybe you could arrange to have another student in the course go into the practice room with you. - Note: Some instructors may not want students to use their mic but rather text chat questions instead.
- When instructed to do so in your course, go to the Adobe Connect room of the course you are taking to participate with the class. This link will be available in UR Courses. When you click the link you will be asked to enter your name as a guest. Please type your first and last initial only for privacy.
-
Watch a student video on how to communicate using microphone.
https://www.youtube.com/watch?feature=player_embedded&v=F_n3WZwnbY8


Helpful Information
- Students are encouraged to use a hard-wired Internet connection for more reliability. DO NOT use wireless if possible. Also, Adobe Connect will not work with dial-up Internet (modem).
- If audio is cutting in and out or system is starting to lag, turn each user's video off and only use audio. Video uses a lot of bandwidth.
- There are Adobe Connect apps available for Android and Apple mobile devices.
- Meeting Issues
- Adobe Connect resources page
- Adobe Meeting Module video (click arrow to play)
- Host troubleshooting guide-PDF
Zoom Web Conferencing Software
Zoom instructions for students (PC version).
Note: instructions will vary depending on the device you use.
-
Click on the Zoom link given to you (i.e. https://zoom.us/j/4505005298). The following window will open in your browser.
-
Click Zoom Meetings and click OK.
Note: If you do not have the Zoom software already installed on your computer you will be asked to install this the first time you use Zoom.
-
Enter your name (First name and last name initial will be fine)
-
Since joining by phone will not be an option, please select the green Join Audio button in order to have the option of using your microphone.
Note: You may wish to test your mic and speaker first before selecting the Join Audio button.
You will then be connected to the meeting room in full screen view with your audio and video automatically turned on. If you wish to text chat instead of using the mic click the Chat icon at the bottom of the screen.
If you hover your mouse near the bottom of the screen, you will see a menu, with various options including Chat, Mute/Unmute, Video/Stop Video, Sharescreen, End meeting etc.


Uploading Video - My Media (Beta)
An open source streaming media server has been integrated that now enables a My Media area within UR Courses.
If your instructor is using the pilot integration of Kaltura CE within UR Courses, you may have access to the My Media area.
This area lists all media hosted on our urcourses-video.uregina.ca server that have been associated with your UR Courses account. You are able to record from your webcam or upload media, as well as preview, edit metadata, and share your media assets with other courses, if desired.
Media recorded or uploaded to your My Media area will be accessible elsewhere in UR Courses where video submissions or media selection are required.
Your media is private to you until you share it with a course, embed it within content, or use it as a submission for an assignment. The media cannot be shared or accessed outside of UR Courses.