An activity is usually something that a student is required to do in some manner. That may include interacting with other students and or the instructor.

UR Courses supports a variety of activities that allow interactive elements in a course such as hand-in assignments, quizzes, and forums. In contrast to resources, students can contribute to an activity and teachers can digitally provide grades and feedback for a student’s contribution.

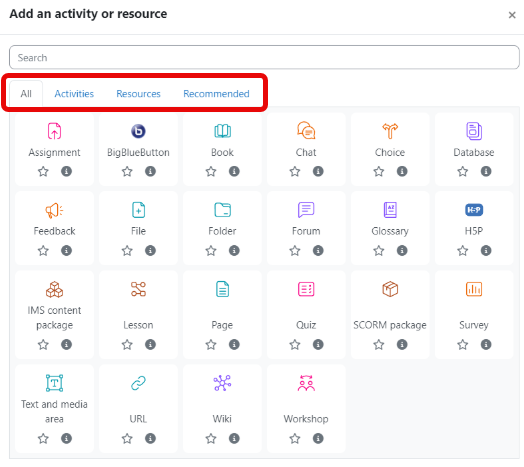
When adding activities or resources, items are now sorted into category tabs. The tabs are:

  • Starred – any activity or resource that is starred as a favorite. This tab only appears if there is at least one activity or resource starred as a favorite.
  • Resources – any resource available
  • Activities – any activities available
  • Popular – the most commonly used resources and activities in UR Courses
  • All – all resources and activities acoverview1

Add an Activity

  1. Turn Edit Mode on.
  2. Click Add an activity or resource in the desired section.
  3. Select the Activities tab and select the desired activity.
  4. Adjust the settings as desired.
  5. Select Save and return to course or Save and display. acoverview2

Remove an Activity

  1. Turn Edit Mode on
  2. Click the Edit menu item next to the activity.
  3. Click on the Delete menu item.
  4. Select Yes to delete the activity. The activity will be removed from the course.


    If you have any suggestions or would like to request or discuss certain functionality, please contact flexible.support@uregina.ca.

Restricting Access

Access to an Activity or Resource can be based upon activity completion, date, grade, group or grouping or user profile fields. When setting up or editing an Activity or Resource, scroll down the settings page to the Restrict access section. Reports2

  • Activity completion: Require students to complete (or not complete) another activity.
  • Date: Date restrictions will release the activity or resource on a specific date and time.
  • Grade: A specific grade must be achieved on a particular activity.
  • Group and Groupings Restrictions: Restrict the activity to a certain group or grouping.
  • Mobile App: Require students to access (or not access) using the Mobile App.
  • User Profile: Controls access based on fields within a student’s profile.
  • Restriction set: Add a set of nested restrictions to apply complex logic.

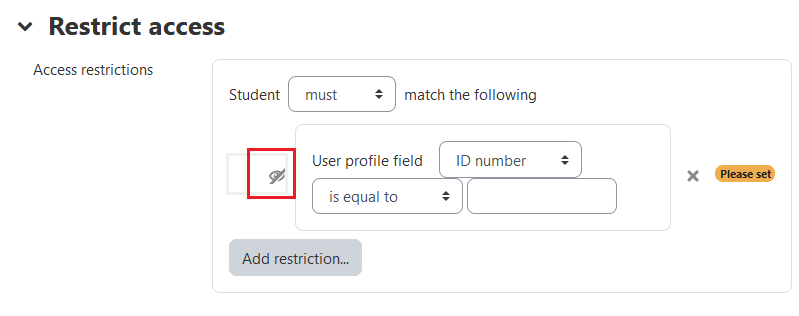
Hiding the Conditions:

  • If the eye is SHUT then students who do not meet that part of the condition will not see the activity at all.
  • If the eye is OPEN the students who do not meet that part of the condition will see the activity but it will be greyed out and have information about why they can't access it.
  • Reports5

ALL or ANY Conditions Further restrictions may be added by clicking Add restriction again, and it is possible to specify that ALL the conditions or ANY of the conditions are required before the activity is made available. Thus, it is possible to use 'Or' as well as 'And' conditions.

Assignment activity


Assignments are an important part of the online classroom. It is an easy way to gather and track student submissions. The feedback options provide instructors a simple way to send grades and comments back to the student.

There are three different assignment types:

  • Assignment – digital submissions or allows students to enter text directly.
  • Media Assignment – students create or upload media that is stored on the Kaltura server.
  • Turnitin Assignment – submissions are checked for plagiarism.

To create an assignment:

  1. Turn Edit Mode on.
  2. Click on the Add an activity or resource link in the desired section.
  3. Open the Activities tab and select Assignment. acassigns1

Read more about Assignment activities here.

Back to top


Attendance activity


The Attendance activity enables instructors to take attendance during class and allows students to view their own attendance record. Once the start date and frequency have been chosen, the dates are automatically filled and ready to track student attendance

To create an attendance activity:

  1. Open the course and turn Edit mode on.
  2. Click Add an activity or resource in the desired section and select the Attendance activity from the menu.
  3. Create a name for the attendance activity or leave it as the default. Add a description if desired.
  4. Under the grade drop down menu, change how students are graded on attendance or disable grades.
  5. Select Save and return to course to save changes. acattendance1

To create an attendance session:

  1. Open the attendance activity.
  2. Click the Add session button.
    acattendance2
  3. Choose the date and time.
  4. To repeat the session, check the box Repeat the session above as follows under Multiple sessions.
  5. Check the appropriate boxes for the days of the week when the session occurs. If there are classes each week, chose Repeat every 1 week(s). For biweekly classes, choose Repeat every 2 weeks.
  6. Choose when the classes will repeat until under Repeat Until. Generally, this is the last day of classes.
  7. Finish by clicking Add. acattendance3

To record attendance:

  1. Open the attendance activity.
  2. Beside the appropriate session, click the green triangle.
  3. For each student, enter Present, Late, Excused or Absent by clicking on the corresponding circle next to the students name.
  4. If desired, leave a comment for the student’s attendance.
  5. Once attendance has been entered, click Save attendance. acattendance4

Other options

Change the acronyms for the attendance. Either, add options to the default set or create a custom set of variables. Other available actions:

  • Make changes to attendance entries by pressing the green arrow.
  • The gear icon allows changes to the time and date of the session.
  • Delete a session by pressing the trash icon . acattendance5
For more information

Back to top


Blog activity


The Blog activity module allows for the creation of blogs within a course. You can have course-wide blogs (everyone in the course posts to the same blog), group blogs, or individual blogs; the latter are useful for assessed activities (where the student is supposed to keep a journal which only they and the instructor(s) can read). Blogs can be configured to be visible for everyone in the class, or only shared between the instructor(s) and student. Comments can be allowed, controlled per post, or disabled entirely.

To create a Blog:

  1. Open the course and turn Edit mode on.
  2. Click Add an activity or resource in the desired section and select the Blog activity from the menu.
  3. Enter a Name for the blog and a brief introduction if desired.
  4. Under the Individual blogs drop down menu, choose to have one blog for each user to have a private or public blog.
  5. Select Save and return to course. acblog1

To create a blog post:

  1. Click on the blog activity.
  2. Click the New blog post button.
  3. Create a title and fill in the Message for the post. Add tags add tags or attach files to any blog post. acblog2

To view a blog:

  1. Click on the blog activity to see all blog posts.
Users can:
  1. Edit the post.
  2. Delete the post.
  3. View comments on a post. This option is only available when there are comments.
  4. Add a comment. acblog3

Resetting the Blog

  1. Click More from Course Navigation and then choose Course reuse.
  2. From the drop-down list on the left, select Reset. acblog4
  3. On the reset page, make sure nothing else is selected, then check Remove all blog entries under the Blogs heading.
  4. Hit Reset Course and it will remove any posts and reset the counters. acblog5

Back to top


Chat activity


The Chat activity module enables participants to have text-based, real-time synchronous discussions.

The chat may be a one-time activity or it may be repeated at the same time each day or each week. Chat sessions are saved and can be made available for everyone to view or restricted to users with the capability to view chat session logs.

Chats are especially useful when the group chatting is not able to meet face-to-face, such as

  • Regular meetings of students participating in online courses to enable them to share experiences with others in the same course but in a different location
  • A student temporarily unable to attend in person chatting with their instrcutor to catch up with work
  • Students out on work experience getting together to discuss their experiences with each other and their instructor
  • A question and answer session with an invited speaker in a different location
  • Sessions to help students prepare for tests where the instructor, or other students, would pose sample questions.

To add the chat tool:

  1. Open the course and turn Edit Mode on.
  2. Click Add an activity or resource and choose the Chat activity in the desired location.
  3. Enter a Name for the chat room. Enter a description for the chat room. For example, enter a description of the expectations of the chat room.
  4. Next chat time: To schedule chat sessions for or with the learners, use this setting to publish a time and date of the next chat. The date selected here will be displayed on the course calendar along with a link to the chat room. Setting a date and time here will not restrict access to the room at other times.
  5. Select either Save and return to course or Save and display. acchat

Join a chat:

  1. Open the Chat activity and click the Enter the chat.
  2. It will open up a chat session. acchat2

Chat window and placeholders

  1. The main message frame. Messages will appear here as they are posted.
  2. To contribute to the conversation, enter a message and press Send.
  3. Participants currently in the chat. Each participant has a Talk and Beep link underneath their name. Using the Talk link will initiate a direct message with the selected user (only the sender and user will be able to see this message). When required, the Beep link can be used to play a beep sound on the user’s computer in order to get their attention. acchat3
For more information

Back to top


Choice activity


The Choice activity module enables an instructor to ask a single question and offer a selection of possible responses.

Choice results may be published after students have answered, after a certain date, or not at all. Results may be published with student names or anonymously.

A choice activity may be used

  • As a quick poll to stimulate thinking about a topic
  • To quickly test students' understanding
  • To facilitate student decision-making, for example allowing students to vote on a direction for the course
  • To facilitate students selecting an option, including with limits for how many students may choose a particular option, for example a paper topic

Creating Choices

To add a choice:

  1. Turn Edit mode on.
  2. Click on Add an activity or resource.
  3. Select Choice from the Add an activity or resource window.
  4. On the Adding a new Choice page, give the Choice a descriptive Name.
  5. Enter the question text in the Description. acchoice1
  6. Choose display mode for options: horizontally or vertically.
  7. Choose whether or not students are allowed to update their choice.
  8. Choose whether or not students are allowed more than one choice.
  9. Choose whether to limit the number of responses allowed.
  10. Enter responses in each Option field. If you require more than 5 fields, click the Add 3 more fields to form button. acchoice2
  11. If limiting the number of responses allowed, in the Limit field enter the maximum number of choices.
  12. Enter a limit time using the options in the Availability section.
  13. Choose whether or not to publish the results and privacy options (anonymous or public) in the Results section.
  14. Select any other options that may apply.
  15. Save and display to see the choice.

View Choice Results

To view results:

  1. Open the Choice you want to see the results.
  2. Click Responses. acchoice3
  3. A graph will appear with the Choice options listed across the top and the users listed below. acchoice4
For more information

Back to top


Course Email activity


The Course Email is a default activity module enables participants to send and receive messages within the course. Some instructors prefer to use this activity rather than having email sent directly to their email account, as that can be more difficult to manage. All messages are preserved within the course itself for the purposes of archiving and organization.

This activity includes an Email notification option, which when enabled, will send a notification email anytime a new message is received within the course. The notification emails are sent to the email address specified in the participants' user profile.

The Course Email activity allows you to select multiple recipients, create HTML formatted messages, and include a single file attachment. To attach multiple files, participants need to zip their files together.

Only one instance of the Course Email activity can be added to each course.

To send an email:

  1. Open Course Email.
  2. Press New Message.
  3. Click in the Recipients field and choose the recipient from the list OR press the head icon to select multiple recipients. acemail1
  4. Enter a Subject for the email.
  5. Enter the Content for the email.
  6. Add attachments if desired.
  7. Press Send.

When emails are received in UR Courses, an email notification can be sent to a uregina.ca email address.

To activate Email Notification:

  1. Open Course Email.
  2. Click on Manage Email Notification. acemail2
  3. Tick mark the classes you want an email notification for. acemail3

Back to top


Database activity


The Database activity module enables participants to create, maintain and search a collection of entries (i.e. records). The structure of the entries is defined by the instructor as a number of fields. Field types include checkbox, radio buttons, dropdown menu, text area, URL, picture and uploaded file.

The visual layout of information when listing, viewing or editing database entries may be controlled by database templates. Database activities may be shared between courses as presets and an instructor may also import and export database entries.

If the database auto-linking filter is enabled, any entries in a database will be automatically linked where the words or phrases appear within the course.

An instructor can allow comments on entries. Entries can also be rated by instructors or students (peer evaluation). Ratings can be aggregated to form a final grade which is recorded in the gradebook.

Database activities have many uses, such as

  • A collaborative collection of web links, books, book reviews, journal references etc
  • For displaying student-created photos, posters, websites or poems for peer comment and review

To create a database:

  1. Open the course and turn Edit Mode on.
  2. Click Add an activity or resource and choose the Database activity in the desired location.
  3. Enter a Name for the database and a description if desired.
  4. Check the other sections and update the settings you wish.
  5. Click Save and display.
  6. In the database page, click to either create a field, import a preset, or use a preset to build your activity. acdata1
For more information

Back to top


Feedback activity


The Feedback activity module enables an instructor to create a custom survey for collecting feedback from participants using a variety of question types including multiple choice, yes/no or text input.

Feedback responses may be anonymous if desired, and results may be shown to all participants or restricted to instructors only. Any feedback activities on the site front page may also be completed by non-logged-in users.

Feedback activities may be used:

  • For course evaluations, helping improve the content for later participants
  • To enable participants to sign up for course modules, events etc.
  • For guest surveys of course choices, school policies etc.
  • For anti-bullying surveys in which students can report incidents anonymously

Creating a Feedback activity:

  1. Open the course and turn Edit Mode on.
  2. Click Add an activity or resource in the desired section and select the Feedback activity from the menu.
  3. Enter a Name for the feedback activity and a brief description if desired.
  4. Put a check mark on Display description to be on the course page for the description to be displayed on the course homepage.
  5. Click Save and return to course or Save and display.

acfeed1

Creating Questions in your Feedback:

  1. Click on the Feedback activity you want to add questions to.
  2. Click Edit questions. acfeed4
  3. Choose the question type from the drop down menu. acfeed2
  4. Enter the question and choose if an answer is required.
  5. Click Save question once complete.
  6. Repeat to add additional questions.
  7. A list of all the question in the feedback and can be moved around using the button near the question name. The questions can be edited or deleted on the right side.

To View the Results:

  1. Click on the feedback activity you want to view the results.
  2. On the top menu, click Responses.
  3. To download results, choose the file type and click Download.

acfeed3

For more information

Back to top


Glossary activity


The Glossary activity module enables participants to create and maintain a list of definitions, like a dictionary, or to collect and organize resources or information.

An instructor can allow files to be attached to glossary entries. Attached images are displayed in the entry. Entries can be searched or browsed alphabetically or by category, date or author. Entries can be approved by default or require approval by an instructor before they are viewable by everyone.

If the glossary auto-linking filter is enabled, entries will be automatically linked where the concept words and/or phrases appear within the course.

An instructor can allow comments on entries. Entries can also be rated by instructors or students (peer evaluation). Ratings can be aggregated to form a final grade which is recorded in the gradebook.

Glossaries have many uses, such as

  • A collaborative or instructor-created bank of key terms, which can also be linked throughout the course where they appear in other text
  • A ‘getting to know you’ space where new students add their name and personal details
  • A ‘handy tips’ resource of best practice in a practical subject
  • A sharing area of useful videos, images or sound files
  • A revision resource of facts to remember

To add a glossary:

  1. Open the course and turn Edit Mode on.
  2. Click Add an activity or resource in the desired section and select the Glossary activity from the menu.
  3. Enter a Name for the glossary activity and a brief description if desired.
  4. On Entries section, select No for Approved by default if you would like to view and approve added entries.
  5. On Appearance section, use the Display format drop down to choose the glossary format. acgloassary1
  6. Update all other settings as desired.
  7. Click Save and return to course or Save and display.

To add an entry:

  1. From the Glossary page, click the Add entry button.
  2. Enter the word you want to define in the Concept field.
  3. Add the definition of the word or concept in the Definition field.
  4. If there are particular keyword(s) for the concept enter in the Keyword(s) field.
  5. You may also add attachments in the Attachment area.
  6. If you want the particular entry linked automatically within the course – check the This entry should be automatically linked checkbox in the Auto-linking section.
  7. Click Save changes.

acglossary2

For more information

Back to top


Lesson activity


The Lesson activity module enables an instructor to deliver content and/or practice activities in interesting and flexible ways. An instructor can use the lesson to create a linear set of content pages or instructional activities that offer a variety of paths or options for the learner. In either case, instructors can choose to increase engagement and ensure understanding by including a variety of questions, such as multiple choice, matching and short answer. Depending on the student's choice of answer and how the instructor develops the lesson, students may progress to the next page, be taken back to a previous page or redirected down a different path entirely.

A lesson may be graded, with the grade recorded in the gradebook.

Lessons may be used

  • For self-directed learning of a new topic
  • For scenarios or simulations/decision-making exercises
  • For differentiated revision, with different sets of revision questions depending upon answers given to initial questions

To create a lesson:

  1. Open the course and turn Edit Mode on.
  2. Click Add an activity or resource in the desired section and select the Lesson activity from the menu.
  3. Enter a Name for the lesson and a brief description if desired.
  4. Put a check mark on Display description on course page for it to appear there.
  5. Under the Availability drop down, select a timeframe for the lesson to be completed as well as set time limits on attempts.
  6. Under the Grade drop down menu, choose how the lesson will be graded as well as allow re-takes.
  7. Once complete, click Save and return to course button. aclesson1

To add the first page:

  1. Click on the lesson within your course.
  2. Here is a list of options for your first page:
    • Import questions: Imports a file for a page. Simply choose the file format and upload the file.
    • Add a cluster: This starts the cluster. Don’t forget to end the cluster at some point.
    • Add a content page: Add a page title and add anything to the Page Contents section. Under the Content drop downs, add ways for the student to navigate between pages. In the Description, label the button and use the drop down menu next to Jump to decide where students are redirected when they click the button. Additional buttons can be added using the other drop downs below.
    • Add a question page: Choose the question type and then click Add a question page. Depending on the type chosen, certain fields will be required to be filled in. Most of the types offer answers and allow a response to filled in, score and jump point for the given answer. Fill in the answer field, what the response should be if that answer is chosen along with a score if that answers is chosen. Finally choose where the user will go next if they select that answer.
  3. Once the appropriate information is filled in, click Save. aclesson2

To add more pages:

  1. Click on the lesson within your course.
  2. Click on Edit lesson.
  3. Under the Actions column, use the drop down menu Add a new page… and select the page to be added. aclesson3

To view the results:

  1. Click on the lesson within your course.
  2. Click the Reports tab.
  3. The results for each student are shown and the average statistics for the lesson. aclesson4
For more information

Back to top


Questionnaire activity


The Questionnaire module allows you to construct surveys using a variety of question types, for the purpose of gathering data from users.

Creating a Questonnaire:

  1. Open the course and turn Edit Mode on.
  2. Click Add an activity or resource in the desired section and select the Questionnaire activity from the menu.
  3. Enter a Name for the questionnaire and a brief description if desired.
  4. Optionally choose a start and end date for the questionnaire in the Availability options.
  5. Optionally choose the options referring to the how many and how responses are submitted in the Response options.
  6. Select Save and return to course or Save and display. acques1

To add questions to the questionnaire:

  1. Click on the questionnaire.
  2. Click the Add questions button.
  3. Choose what type of question to add from the drop down menu then click Add selected question type.
  4. Fill any of the required fields. Most questions require Question Text and Possible answers, but others may require something different filled in.
  5. As questions are added, they will show up under Manage questions. If a question is mandatory, click the green circle and it will turn red. The green circle identifies optional questions and the red circle identifies mandatory questions. acques2

To add questions to a non-empty questionnaire:

  1. Click on the questionnaire.
  2. Click the View All Responses button from More drop down list.
  3. Click Questions in the top bar.
  4. A list of all the questions in the questionnaire will be shown and more can be added. acques3

To view the results:

  1. Click on the questionnaire.
  2. Click the View All Responses button from More drop down list. This shows a default view for the results.
  3. Using the Ascending order and the Descending order buttons, adjust how results are displayed.
  4. All responses can be deleted by clicking on the Delete ALL Responses button.
  5. To download the results as a text file click Download in text format.
  6. To view a list of all respondents, click the List of responses button. If the questionnaire is anonymous, the responses will only be numbered in the order they were submitted.
  7. A response can be clicked and it will show the answers of that specific student. The results can also be downloaded or deleted. acques4
For more information

Back to top


Quiz activity


The Quiz activity enables an instructor to create quizzes comprising questions of various types, including multiple choice, matching, short-answer and numerical.

The instructor can allow the quiz to be attempted multiple times, with the questions shuffled or randomly selected from the question bank (this is recommended if cheating is a concern). A time limit may be set. The quiz can be set to automatically open for attempts and close to limit when students may complete the quiz, or it can be left open for students to attempt whenever they like.

Each attempt is marked automatically, with the exception of essay questions, and the grade is recorded in the gradebook. You can leave feedback on the attempts or adjust grades if needed. It is also possible to set automatic feedback based on answers to a question or a grade range.

The instructor can choose when and if hints, feedback, and correct answers are shown to students, depending on the purpose of the quiz.

Quizzes may be used

  • As course exams
  • As mini tests for reading assignments or at the end of a topic
  • As exam practice using questions from past exams
  • To deliver immediate feedback about performance
  • For self-assessment

Read more about Quiz activity here.

Back to top


SCORM package activity


A SCORM package is a collection of files which are packaged according to an agreed standard for learning objects. The SCORM activity module enables SCORM or AICC packages to be uploaded as a zip file and added to a course.

Content is usually displayed over several pages, with navigation between the pages. There are various options for displaying content in a pop-up window, with a table of contents, with navigation buttons etc. SCORM activities generally include questions, with grades being recorded in the gradebook.

SCORM activities may be used

  • For presenting multimedia content and animations
  • As an assessment tool

To create a SCORM package activity:

  1. Open the course and turn Edit Mode on.
  2. Click Add an activity or resource and choose the SCORM package activity in the desired location.
  3. Enter a Name and a description if desired.
  4. Upload your SCORM package in the Package section.
  5. Check the other sections and update the settings you wish.
  6. Click Save and return to course or Save and display.

acSCORM

For more information

Back to top


Survey activity


The Survey activity module provides a number of verified survey instruments that have been found useful in assessing and stimulating learning in online environments. An instructor can use these to gather data from their students that will help them learn about their class and reflect on their own teaching.

Note that these survey tools are pre-populated with questions. Instructors who wish to create their own survey should use the Feedback activity module.

To create a Survey:

  1. Open the course and turn Edit Mode on.
  2. Click Add an activity or resource in the desired section and select the Survey activity from the menu.
  3. Enter a Name for the survey and choose the survey type.
  4. Enter a brief description for the survey if desired and put a check mark on description to be on the course page if you would like it to appear there.
  5. Select Save and return to course or Save and display. acsurvey1

To view the responses:

  1. Click on the survey.
  2. Click Response reports.
  3. There are two ways to view the results and those can be changed in the top navigation menu:
    • Summary: Show a basic and brief summary of all the responses.
    • Scales: Scales will divide the results into categories.
    • Questions: Breaks down the results for each questions.
    • Participants: Shows responses for a specific participant.
    • Download: Results can be downloaded in a variety of formats. acsurvey2
For more information

Back to top


Wiki activity


The Wiki activity module enables participants to add and edit a collection of web pages. A wiki can be collaborative, with everyone being able to edit it, or individual, where everyone has their own wiki which only they can edit.

A history of previous versions of each page in the wiki is kept, listing the edits made by each participant.

Wikis have many uses, such as

  • For group lecture notes or study guides
  • For members of a faculty to plan a scheme of work or meeting agenda together
  • For students to collaboratively author an online book, creating content on a topic set by their tutor
  • For collaborative storytelling or poetry creation, where each participant writes a line or verse
  • As a personal journal for examination notes or revision (using an individual wiki)

To create a wiki:

  1. Open the course and turn Edit Mode on.
  2. Click Add an activity or resource in the desired section and select the Wiki activity from the menu.
  3. Enter a Name for the wiki and a brief description if desired.
  4. Put a check mark on description to be on the course page if desired.
  5. Enter the first page name.
  6. Optionally change if the wiki will be one for the whole course or one per person by using the Wiki mode drop down menu.
  7. Select Save and return course or Save and display. acwiki1

To add the first page to the wiki:

  1. Click on the wiki within your course.
  2. Type a title for the first page under New page title.
  3. Choose the format of the page. The default format is HTML.
  4. Click Create page.
  5. Enter the information for the first page.
  6. When finished entering and formatting the content, select Save at the bottom of the page. acwiki2

To add another page to the wiki:

  1. Click on the wiki.
  2. Click Edit from the drop down list.
  3. Type the name of the new page in double brackets “[[]]”
  4. Click Save. acwiki3
  5. Click the red link and create the page the same way the first page was created. acwiki4

To edit a page in the wiki:

  1. Click on the wiki.
  2. Navigate to the page to be edited by:
    • Clicking the links to get to the page or
    • Select Map from drop down list and select the page to edit.
  3. Once on the page to edit, select Edit from the drop down list at the top. acwiki5
  4. Edit the page and once complete click Save.
For more information

Back to top


Workshop activity


The Workshop activity module enables the collection, review and peer assessment of students' work.

Students can submit any digital content (files), such as word-processed documents or spreadsheets and can also type text directly into a field using the text editor.

Submissions are assessed using a multi-criteria assessment form defined by the instructor. The process of peer assessment and understanding the assessment form can be practised in advance with example submissions provided by the instructor, together with a reference assessment. Students are given the opportunity to assess one or more of their peers' submissions. Submissions and reviewers may be anonymous if required.

Students obtain two grades in a workshop activity - a grade for their submission and a grade for their assessment of their peers' submissions. Both grades are recorded in the gradebook.

To create a Workshop:

  1. Open the course and turn Edit Mode on.
  2. Click Add an activity or resource in the desired section and select the Workshop activity from the menu.
  3. Enter a Name for the workshop and a brief description.
  4. Put a check mark on description to be on the course page if desired.
  5. Under the Grading settings decide how the grades are assigned. Optionally set the Grading strategy and split the marks for the submission vs. assessment.
  6. Under Submission settings enter instructions for submitting files and change any of the settings about file submission.
  7. Select Save and return to course or Save and display.

acworkshop1

To compete the setup phase:

  1. Click on the workshop.
  2. Under the Setup phase, click any of the links that do not have a green checkmark and the corresponding page will open where additional information is required. Any green checkmarks mean that the information is already filled in.
  3. Click Assessment form to complete it.
  4. Enter how submissions are graded. Marks are broken into Aspects similar to a rubric. Add a description and how each aspect will be marked.
  5. Multiple aspects can be graded and more aspects can be added by clicking Blanks for 2 more aspects near the bottom.
  6. Once complete, click Save and close. acworkshop2 acworkshop3

To set up the submission phase:

  1. Click on the workshop activity.
  2. Once ready, click Switch to submission phase to begin the phase and allow students to submit files.
  3. Under Submission phase click Provide instructions for submissions.
  4. In Assessment settings enter the information for the key points of the task.
  5. Click Save and display once complete.
  6. Click Allocate submission under the Submission phase.
  7. Allocate which students will review which of their peers. There are 3 ways to allocate the review process:
    • Manual – Under Add reviewer chose who will review that submission. Under Add reviewee chose whose submission that participant will review.
    • Random – Choose how many reviews per submission or per reviewer and UR Courses will randomly assign everyone the specified number of submissions to review.
    • Scheduled – To setup scheduled allocations, a submission deadline must first be entered. This can be specified in workshop settings. The settings for scheduled allocations are the same as random. At the specified deadline, the submissions will be randomly and automatically allocated. acworkshop4

To complete the setup phase:

  1. Click on the workshop activity.
  2. Click Switch to the assessment phase to begin the assessment phase. This will allow participants to access the submissions allocated to them. As participants complete the peer assessment process, any assigned grades or feedback will be visible.
  3. To view an assessment, click the title of the submission. The assigned grade and feedback will be shown.
  4. To override the grade or feedback click on whichever item and enter the new grade or feedback. If the grade is not overridden the grade will automatically be determined based on a comparison. This can also be overridden in the Grading evaluation phase. acworkshop5

To move to the grading phase:

  1. Click on the workshop within your course.
  2. Click Switch to the evaluation phase to switch to the grading phase which will show the peer assessment grades and allow for the assessment of the peer reviews.
  3. Under Grading evaluation setting choose how strict the system will grade the reviewers. The system picks which review it thinks is the ‘best’ one and will assign it 100%. Then the system gives grades to the remaining assignments based on their similarity to the ‘best’ one. This can be overridden by clicking the grade given.
  4. Provide a conclusion for the workshop by clicking the Provide a conclusion of the activity. Scroll down to feedback and fill in the Conclusion portion.
  5. Once completed, click Close workshop to close the workshop and publish all the marks. acworkshop6
For more information

Back to top