Resources are used to share content such as files, links, pages and other formats, within the course. UR Courses supports a range of resource types which instructors can use in a vareity of ways within their courses.


When adding activities or resources, items are now sorted into category tabs. The tabs are:

All

  • All resources and activities

Activities

  • any activities available

Resources

  • any resources available

Popular

  • the most commonly used resources and activities in UR Courses.

Resources

If you have any suggestions or would like to request or discuss certain functionality, please contact flexible.support@uregina.ca.

The following resource types are currently available.

Resources

UR Courses supports a range of different resource types that allow for a variety of digital content in a course. These can be added by clicking Add an activity or resource when editing is turned on. Resources1

Book – designed for a short multi-page resource in a book-like format with chapters and sub chapters.

File – to provide a file as a course resource.

Folder – to display a number of related files inside a single folder to reduce scrolling on the course page.

Group Members – to list the members of all groups in one selected grouping.

IMS Content package – is a collection of files which are packaged according to an agreed standard so they can be reused in different systems.

Kaltura Video Resources – upload video or make a recording directly form a webcam.

Lightbox Gallery – to upload images to be displayed in a gallery style.

Page – to create a web page resource using the text editor. Can display text, images, sound, video, links and embedded code, such as Google maps.

Reading List (inline) – to include a selection of citations from associated Leganto reading lists directly within the course.

Syllabus – it provides a file as a course syllabus. Where possible, the file will be displayed within the course interface; otherwise students will be prompted to download it.

Text and media area – to display text and multimedia on the course page.

URL – to provide a web link as a course resource. Anything that is freely available online, such as documents or images can be linked to.

Adding a Resource

To Add a Resources:

  1. Press the Edit mode
  2. Select the Add an Activity or Resource button Resources2
  3. Open the Resource
  4. On the setting page for the new resource, configure the options as required and Save.

Adding and Removing Files


Adding Copyrighted content to UR Courses

All materials posted into UR Courses must fall within one of the following categories: the University’s Fair Dealing Guidelines, other exception under the Copyright Act, the University’s library licensed resources (according to the terms of use), public domain, Creative Commons or other open access licence, materials in which you are the copyright owner, a transactional licence, or permission obtained from the copyright holder. If you have any questions, please contact the University’s copyright officers at copyright@uregina.ca.

On August 31, 2016, the University of Regina’s licence with Access Copyright expired. As a result of this change in the copyright environment, there have been some changes to the way copyright is being managed in UR Courses.

Ares Reserves (Preferred Option)

A new tool, Ares Reserves, has been into UR Courses in Fall 2016 for distributing and reviewing course readings. Copies of copyright-protected readings distributed in UR Courses will need to be reviewed using this service or the option described below. The Ares Reserves system is particularly aimed at the distribution of course readings through UR Courses. Thus, copies of book chapters and articles from print journals being posted to UR Courses should be submitted for copyright review using the Ares Reserves system. Ares Reserves uploads is covered in Section 8: Activities.

Reading List Service (Alternative Option)

Faculty can submit their reading lists or course materials to copyright@uregina.ca for review. The copyright status of course readings will be assessed, persistent links to available Library licensed resources created, and any needed transactional licenses acquired. This service also aims to lower costs to students by leveraging existing Library licensed resources.


Adding Files to the Course Main Page


To add a file to your course: Quick Method: (May not work in all browsers)

  1. Switch Edit Mode on.
  2. Drag and Drop the file into the course where it should appear. Resources1
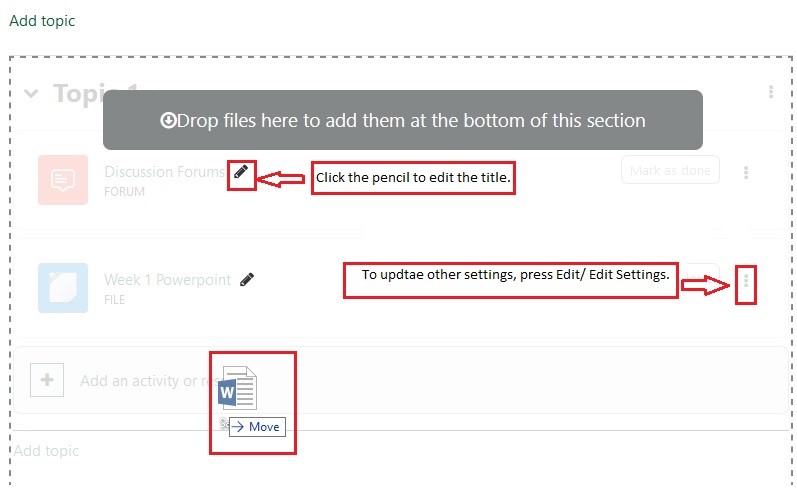
  3. Once uploaded, edit the title of the file by clicking on the pencil icon or edit other options by clicking on the editing icon.

Longer Method:

  1. Switch Edit Mode on.
  2. Click the Add an activity or resource link, then within the options, select File.
  3. Configure the options for the new file. All sections can be expanded by clickingExpand all link at the top right. Resources3
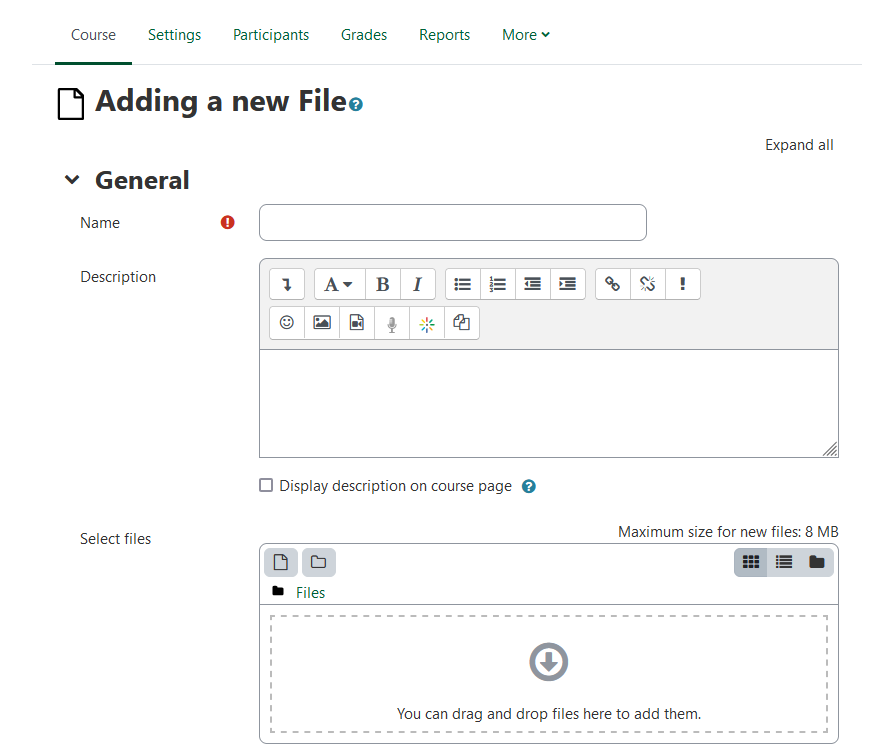
  4. In the General section, type the text you wish to use for the link within the Name field. Add a short description or summary if desired.
  5. Go to the Select Files section and click on the Folder Icon Resources4
  6. A dialog box (known as the File Picker) will appear where an existing file can be selected or a new file uploaded. Resources5
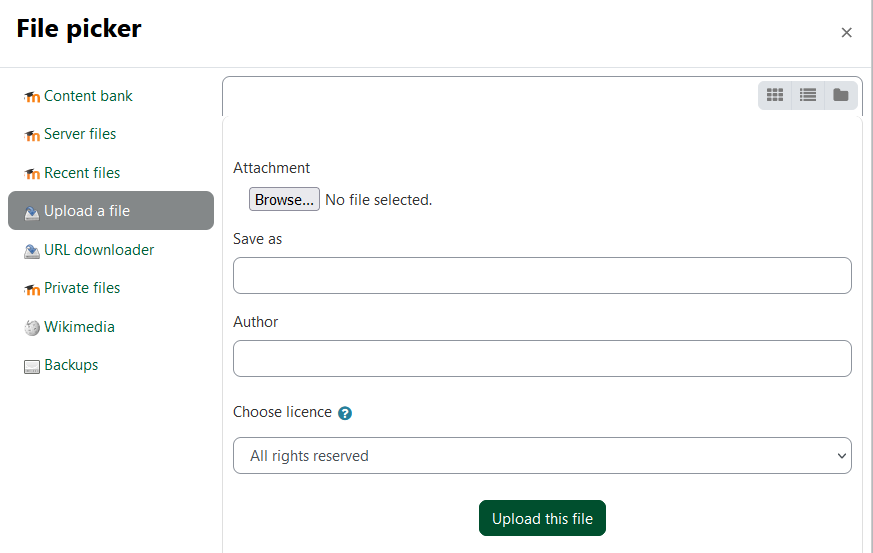
  7. Click the Browse or Choose File button and select the document you want to upload.
  8. Once a file has been selected, click on Upload this file to start uploading the file.
  9. Within the Common module settings section, set the Visible option to Show or Hide (the default is Show).
  10. Save changes.

Removing Files to the Course Main Page


To remove a resource:

  1. Press Edit mode.
  2. Click the three dots next to the resource.
  3. Click Delete in the menu. Resources6
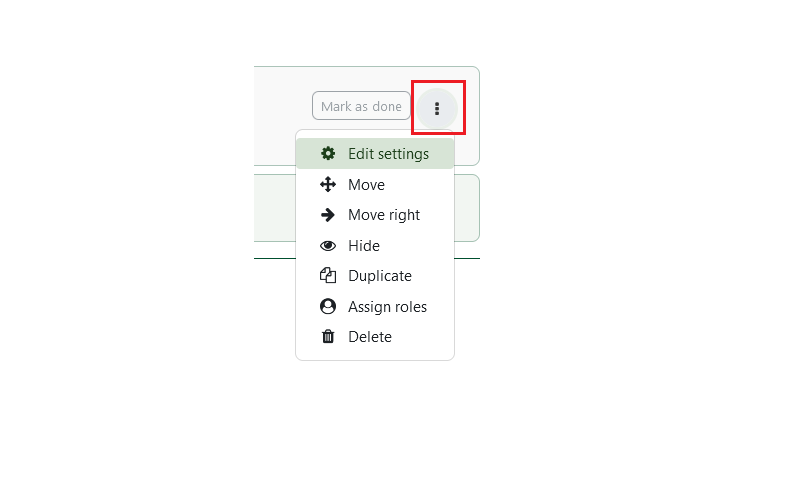
  4. Confirm the deletion by select Yes to completely delete.

Note: Ensure a copy of the file is saved to your PC. Files deleted from UR Courses cannot be recovered.

Back to top


Book resource


The Book module enables an instructor to create a multi-page resource in a book-like format, with chapters and sub-chapters. Books can contain media files as well as text and are useful for displaying lengthy passages of information which can be broken down into sections as well as providing a linear path for progression through chapters.

A book may be used for a variety of things, such as:

  • To display reading material for individual modules of study
  • As a course handbook
  • As a showcase portfolio of student work

The Table of Contents on the top left of book pages provides easy navigation between chapters and sub-chapters and the arrows on the top and bottom right of the page allow linear navigation within the book.

Books are easy to edit and are stored online, meaning the file is accessible from anywhere and can be read in a browser without downloading a file. The contents can, however, be printed to a PDF .

To create a Book:

  1. Open the course aand switch the Edit mode on.
  2. Click Add an activity or resource in the desired section and select the Book from the menu. book1
  3. Enter a Name for the book and a brief Description
  4. Put a check mark on description to be on the course page for the description to show on the main course page.
  5. Under Appearance: organize the book in the Chapter Formatting drop down menu by selecting None, Numbers, Bullets or Indented.
  6. Put a check mark on Custom titles to create your own or rely on the generated Chapter Number convention.
  7. Select Save and Display. book2

To add the first chapter to the book:

  1. Locate the book and click on the Book’s title to access it.
  2. If no chapters have yet been added, users are redirected to the Add a Chapter page automatically. If a chapter already exists, users will be taken to the first page of the first chapter.
  3. On the Add a Chapter page, enter a Chapter Title.
  4. Enter text in Content area (when pasting from Word, it’s recommended to click on the Paste from Word button.
  5. When finished, select Save changes. book3

To add additional chapters:

  1. Switch the Edit mode on
  2. Locate the book and click on the Book’s title to access it.
  3. The Table of Contents appears at the top of the left sidebar column
  4. Use the Plus symbol icon to add chapters/subchapters in the desired locations.
  5. On the Add a Chapter page, enter a Chapter Title.
  6. Put a checkmark on Subchapter if the page is a subchapter.
  7. Enter or copy and paste text into the Content area.
  8. Select Save changes book4
For more information

Back to top


Folder resource


The Folder module enables an instructor to display a number of related files inside a single folder, reducing scrolling on the course page. A zipped folder may be uploaded and unzipped for display, or an empty folder created and files uploaded into it.

A folder may be used

  • For a series of files on one topic, for example a set of past examination papers in pdf format or a collection of image files for use in student projects
  • To provide a shared uploading space for instructors on the course page (keeping the folder hidden so that only instructors can see it)

Adding a Folder (Multiple Files)

  1. Enable Edit mode
  2. Click the Add an activity or resource button
  3. Choose Folder
  4. Enter a Name and an option description for the resource.
  5. To display the description on the Course page, check that option.
  6. Within the Content section, click on the Add bottom to select a ZIP file.
  7. Once uploaded, click on the ZIP file to bring up its properties. Select Unzip to extract the content of the ZIP archive. Folder1
  8. Save and Return to Course
  9. Within the Folder resource, the list of documents is displayed. (Once a ZIP File has been unzipped, the ZIP file itself can be deleted if it was only a mean to upload multiple files).

Force Download

This setting is located in the Content section of the Folder settings. It is enabled by default.
Folder2 When this setting is enabled and a student tries to open a file within the folder, the file will automatically be downloaded to a student’s computer. When this setting is not enabled and a student tries to open a file within the folder, supported files (HTML, PDF, JPEG, etc.) will open within a student’s web browser. Folder3 Students still have the option to manually download the files contained within the folder to their computer. Folder4

For more information

Back to top


Kaltura Video and Media Files


The Kaltura Video Resource allows you to add media to your course by uploading video, audio, images, or making a recording from your webcam. All content is stored on the University of Regina's Kaltura Premium cloud.

Refer to the Kaltura Video Resource guide for additional documentation.

Adding a Text and Media Area

Text and Media are serve as an opportunity to enter content anywhere on the course main page. It can be used to add text, images, multimedia or code between other resources in the different sections and help improve the appearance of the course. It can be used to split up lists of activities with a subheading or image, display any embedded video or audio files or add a short description to a course section, activity or resource. To add a Text and Media area

  1. Switch Edit mode
  2. Click on Add an activity or resource and choose Text and Media Area
  3. In the text box, add your text, images, sound or video files as desired.
  4. Expand the other settings to specify what you require.
  5. Click Save and return to course.

Adding a Media File

To add a Media file:

  1. Press Edit mode.
  2. Click on Add an activity or resource.
  3. Choose Kaltura Video Resource. Resources7
  4. Enter the name and description.
  5. Press Add Media to upload a new media file.
  6. A pop-up window will appear that allows you to select from media within your My Media library. You can also upload or record new media by selecting from the options within the Add New menu.
  7. Find the video you wish to upload and select </> Embed in line with it.
  8. Press Save and return to course.

Back to top


Page resource


The Page module enables an instructor to create web page resources using the text editor. A page can display text, images, sound, video, web links, embedded code - such as Google maps, etc.

Advantages of using the page module rather than the file module include the resource being more accessible (for example to users of mobile devices) and easier to update as it is stored right in the course and does not require downloading to change.

For large amounts of content, it's recommended that a book is used rather than a page, because books have navigation and allow for sub-chapters.

A page may be used for a variety of things, such as:

  • To present the terms and conditions of a course or a summary of the course syllabus
  • To embed several videos or sound files together with some explanatory text
  • To embed maps or other multimedia, such as resources from the publisher
  • To give a unit overview
For more information

Back to top