Course Administration
Maybe you need to modify your course name, or hide the course from students?
This guide provides basic information about administering your course site.
Course Name
A course within UR Courses can be renamed, whenever appropriate, if you are able to edit the course content.
Enrolment is based on the Course ID number, which is not editable, so changes to the course name will have no effect on enrolment.
To rename a course within UR Courses, please follow these steps:
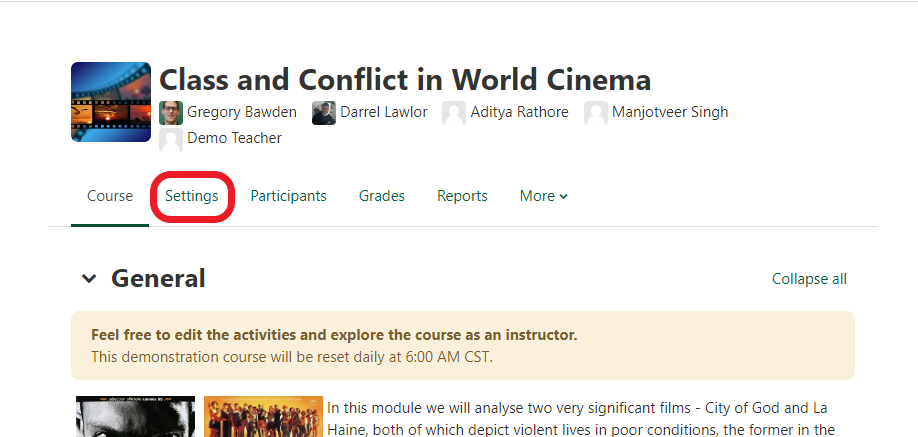
- Click Settings in the navigation bar.

- In the General Section page, change the name of the course within the Course full name field. This is the title of the course displayed in the My Courses page, My Courses block on the Dashboard page and at the top of each course page.
- The Course short name can also be changed, although it must be unique (relative to other short names). The course's short name is displayed in the navigation and used in the subject line of all email messages associated with the course.

Course Availability
A UR Courses' site availability can be changed at any time. Note: Students cannot access the course when hidden.
If your course is hidden, you will see a banner on your main course page.
To change the availability of a course within UR Courses, please follow these steps:
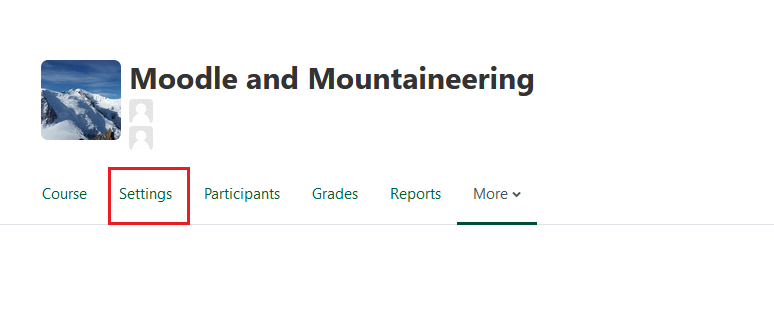
- Within your course, click Settings in the navigation bar.
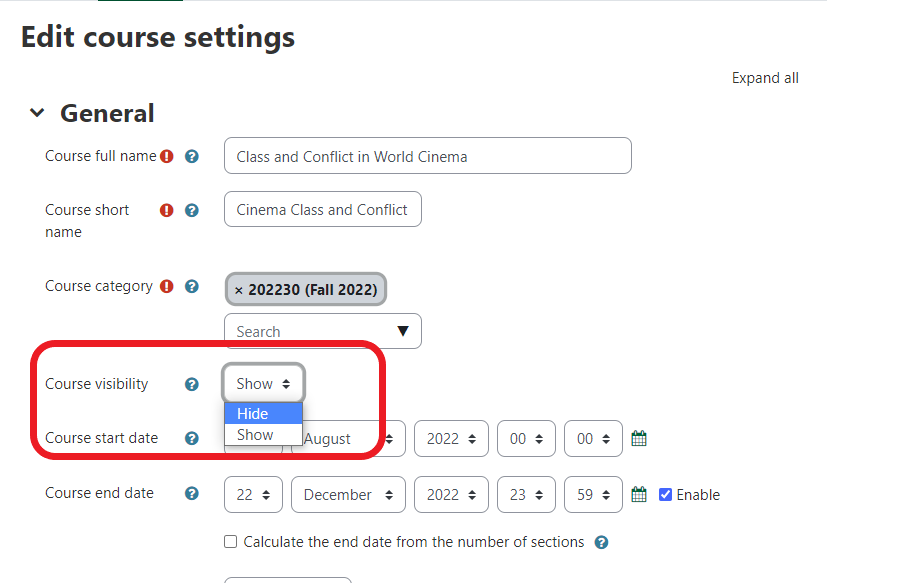
- On the Settings page, change the course visibility to either:
- Show the course will be available to students.
- Hide the course will be hidden from students.
- Scroll to the bottom of the page and click Save and display.

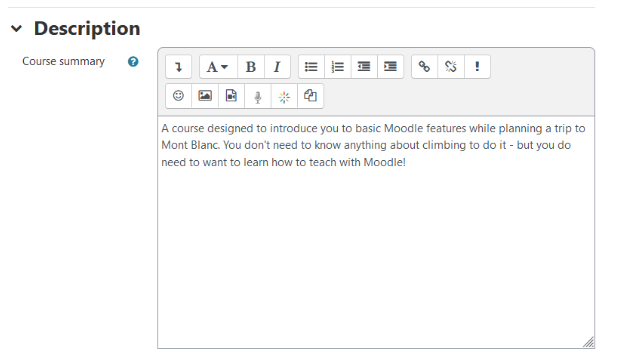
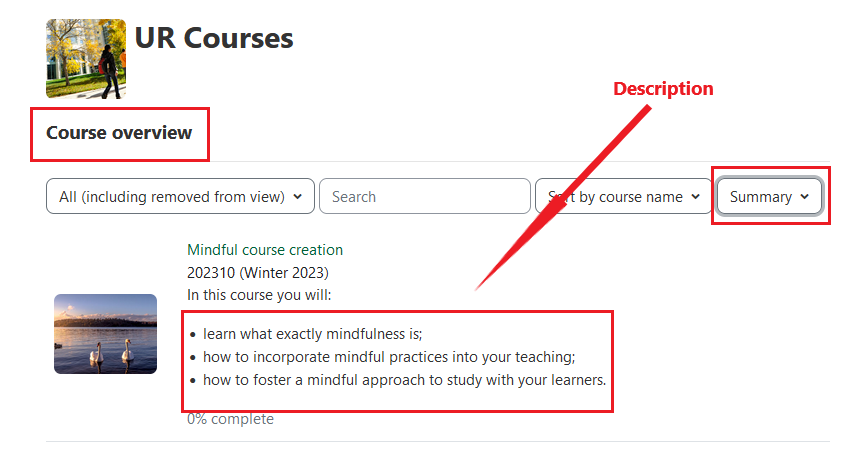
Course Summary
A course summary can be provided to students in advance, or in place of, access to the full course. The summary can contain images, links, and attached files.
The course summary is always available to students enrolled in the course, even when the course itself has been made unavailable.
To update the course summary for your course, please follow these steps:
-
Within your course, click Settings in the navigation bar.
-
On the Edit course settings page, scroll down to the Course summary area. You can include information about the course which will be viewable on the Dashboard and Site home pages.
-
Scroll down to the bottom of the page and click Save and display.

-
To see the summary as a student, visit the My Courses page and select the view as Summary.
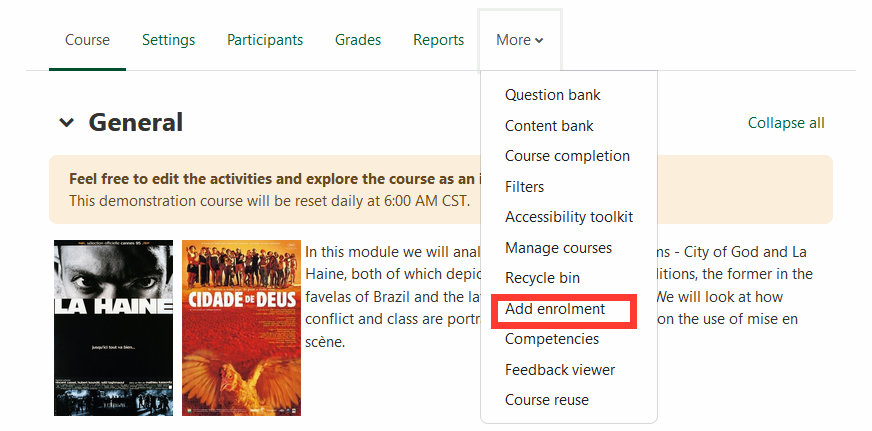
Associate Enrolment
Enrolment processing begins one month prior to the start of the term.
To associate enrolment with your course, follow the steps outlined below.
- If your course isn't ready for student access, or you want to open it to students later, ensure that it is not currently available to them, see the section on Course Availability
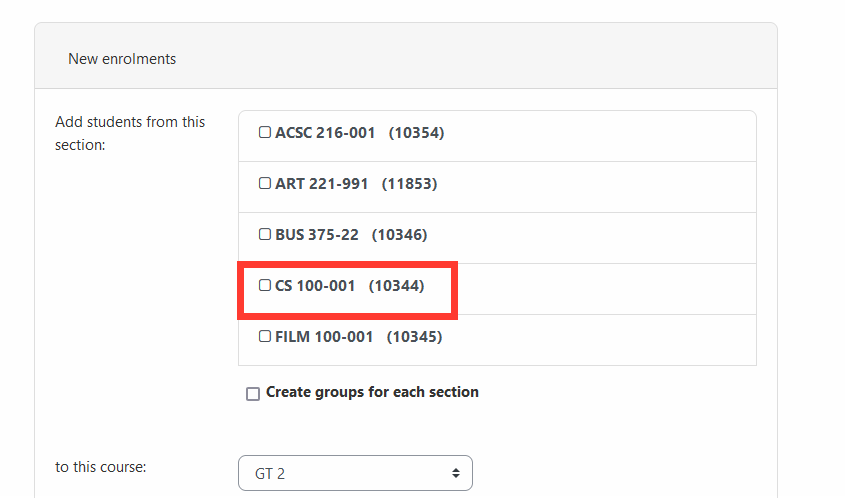
- Open Add Enrolment select the appropriate term.
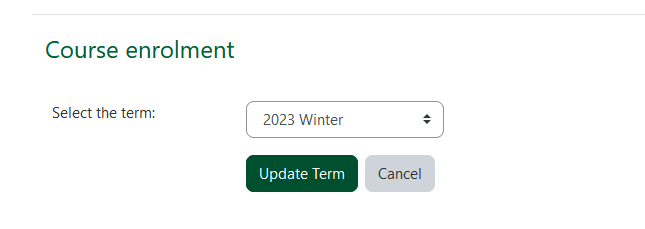
Note: The sections in Banner that are linked with your account will be listed if they have not already been associated with another course.
- Select the sections you wish to associate with the current course.
Assigning Roles & Adding TA’s
When you have the Teaching or Course editing role within UR Courses, you are able to assign roles to other users within the same course. There are 7 basic roles to choose from:
- Teaching – Teachers have full access to all aspects of the course.
- Course editing – same capabilities as the Teaching role, except they are not listed as a course contact.
- Non-editing Instructor – can teach in courses and grade students, can see items that are hidden, but may not add, remove, or alter content, resources, or activities. Can view all group activities.
- Lab Instructor – same capabilities as the Non-editing Instructor role, but labelled differently for context.
- Teaching Assistant – same capabilities as the Non-editing Instructor and Lab Instructor role, but labelled differently for context.
- Student – can view visible resources on the course page and participate in activities, but cannot alter resources or activities, cannot see grades for anyone but self. If groups are used, can access information in own group.
- Invited Guest – the same capabilities as a student, but Invited Guests will not show up in the gradebook.
To add someone to the course and assign a role:
- Click Participants in the navigation bar..
- Click Enrol users
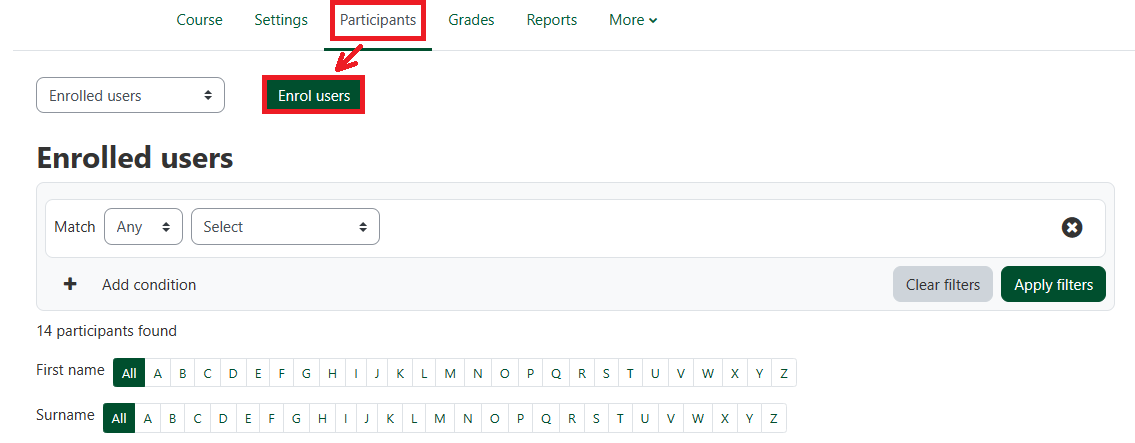
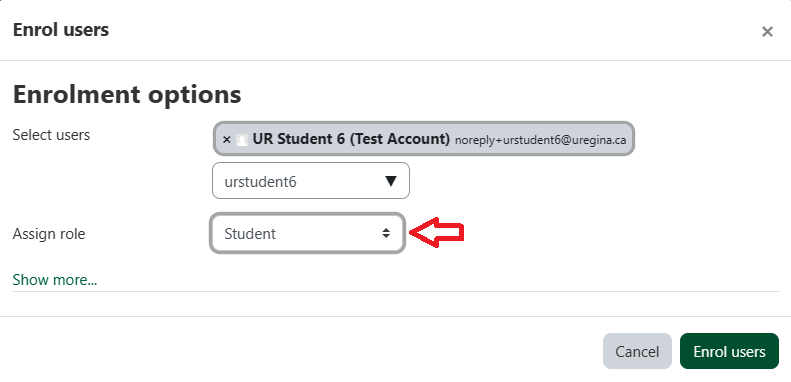
- In Select users search for the user you want to add
- From the Assign roles drop down menu choose a role !!!Note: To add a TA to the course, select the Teaching Assistant role.
- Continue to add names to the list as needed.
- Once you've found the user(s), click on Enrol users.
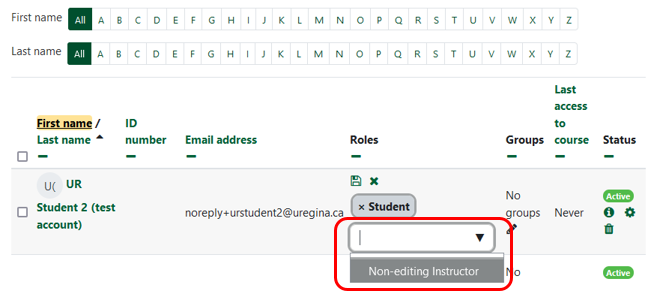
To assign a role to someone already in the course:
- Click Participants in the navigation bar.
- Find the user whose role you want to change.
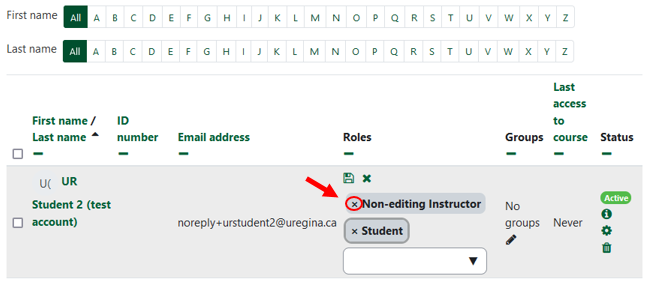
- Click the Pencil icon in that user's Roles column.
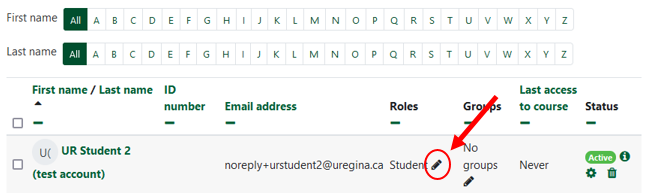
- Select the desired role you wish to assign from the drop down menu.
- Click the X beside the role to unassign it. The Student role cannot be removed from users added through External database enrolment.
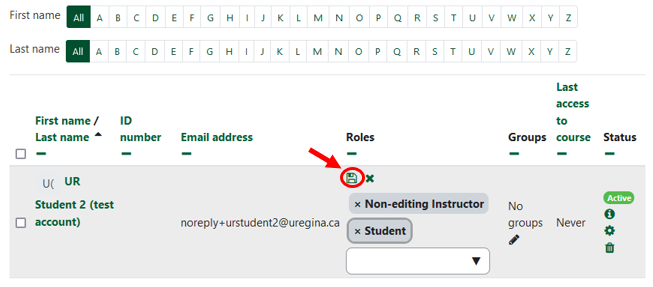
- Click the save icon.
To remove someone from the course:
Anyone who is enrolled in a course manually by the Instructor MUST also be unenrolled manually by the Instructor. It is important to remove Non-Editing Teachers every semester as previous Teaching Assistants will still have access to the course and any grades entered.
- Click Participants in the navigation bar.
- Find the user to be removed from the course.
- In the Status column, click the trash icon to remove the user from the course.

- Click Unenroll to confirm removing the individual from the course.
Course Import and Backup
Import
Course activities and resources can be moved from course to course using the import function. This will allow teachers to re-use instead of re-creating one or more activities or resources.
Please review the Moodle documentation to import course data.
Create a Backup
A course backup can be made within UR Courses at any time if you are able to edit the course content. This can be useful to preserve an instance of the course or to ensure that the course can be restored to a certain point in time.
Information services will retain a course backup for six months after the end of the semester the course was last delivered. To ensure you have a copy of your course, it is advised to make your own personal backups before and after making major changes to your course.
How to Backup a course
To see a written guide of Course Backup please visit the Moodle documentation .
Restore a Backup
A backup file can be restored to create a new course, restore activities and/or resources into an existing course, or overwrite the contents of an existing course completely.
How to Backup a course
To see a written guide of Course Restore please visit the Moodle documentation .
Course File Upload Size Limit
The initial file upload size limit is 128 MB (older courses may have a limit of 16 MB), but it is possible to change this. Size limits apply to files instructors upload to the site, student submissions to assignments and quizzes, and files attached in the course Email tool.
- Within your course, click on Settings option from navigation bar

- Click on Files and uploads

- Click on the dropdown menu and select the size you wish to use. Note: none of these file sizes are intended to allow uploading, submitting, or emailing of video or audio files.
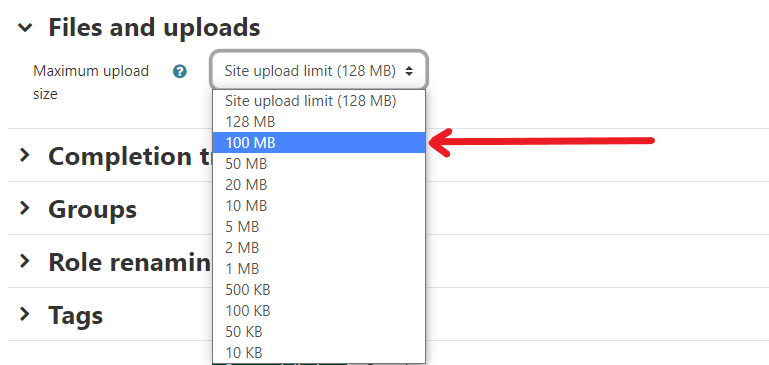
- Click Save and display.

Groups and Groupings
You can create groups in your course to use with certain activities and help organize your students.
How To Add Users To Groups
See Moodle Docs to learn more about Groups and how to use them:
Participants
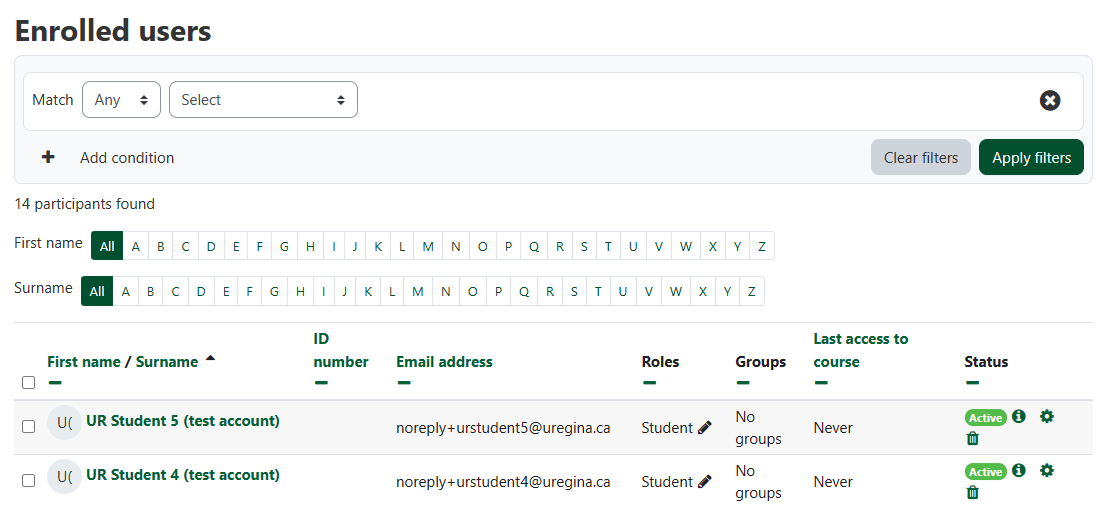
Participant List
The Participants list shows all individuals that were enrolled in the course during the semester.
 Anyone that is currently enrolled in the course.
 Students that have withdrawn from the course during the semester. These students will no longer have access to the course but appear as suspended in the participants list.
 Last access to course will identify when the student last opened the course module.
Participant Filter
Instructors can change the view of participants in the course by using a filter. This allows the instructor to refine the list to a subset of participants based on specific criteria. There are two methods for filtering the list of participants:
- select from pre-defined options such as keyword, role, and status
- add additional conditions
The participants filter can be set up either by only selecting from the pre-defined filter options, or by using a combination of both methods (a pre-defined filter option and additional conditions).
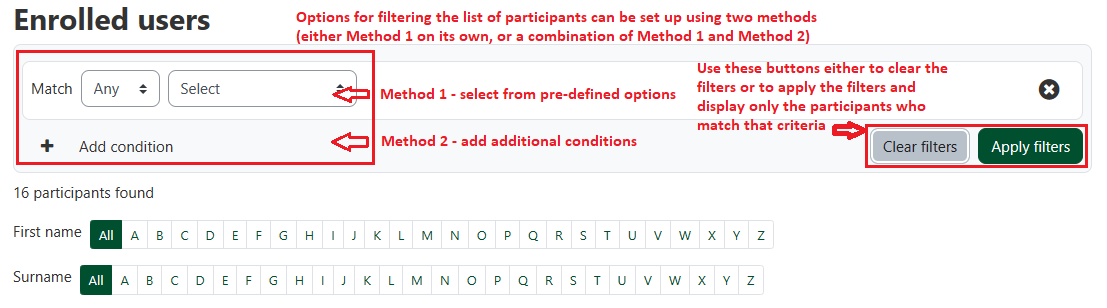
To Add a Participant Filter
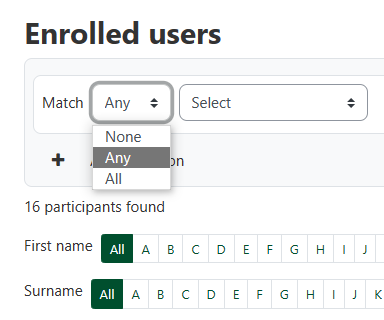
- Indicate who should be displayed in the list of participants by selecting an option from the Match drop-down list: match none of the criteria, any of the criteria, or all of the criteria.
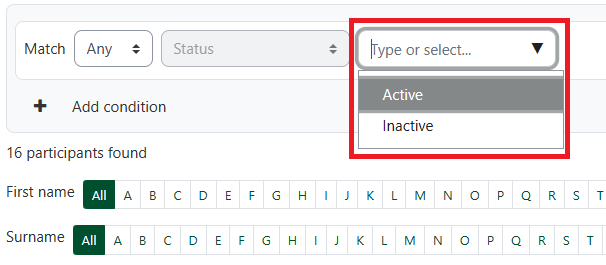
- Select one of the filter options provided in the drop-down list.
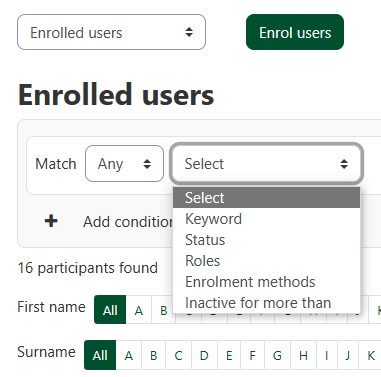
- A new drop-down list will appear to the right of the pre-defined filter option just selected. The options available in the new drop-down list will be based on that pre-defined filter option. Select the appropriate option.

- If that is all the criteria required for filtering the participants list, click on the Apply filters button to display the filtered list. If additional conditions are required, proceed with the next steps.
- Add additional conditions by clicking on the Add condition button.
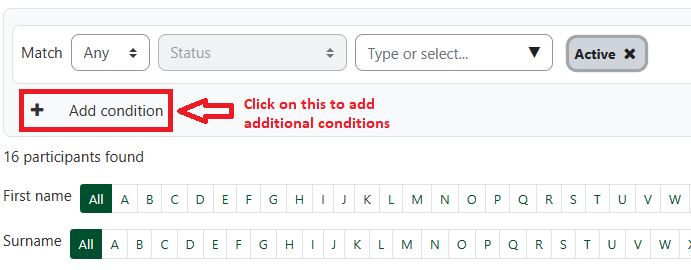
- Create the next filter using selections from the Match field and the two drop-down lists that appear. This is the same process that was used to create the first filter.

- Additional filters can be added by clicking on the Add condition button and making the appropriate selections from the Match field and two drop-down lists.
- Click on the Apply filter button to display the filtered list.
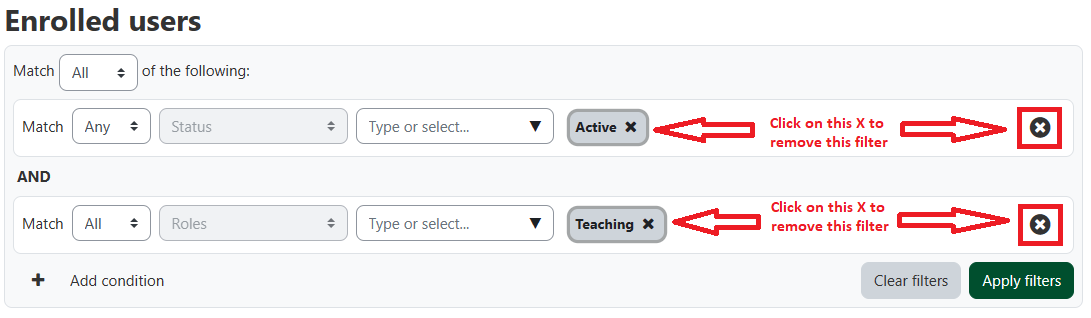
To Remove a Participants Filter
- To remove all filters, click on the Clear filters button.

- To remove individual filters, click on the X at the right end of that filter’s row.

Participants
Participant List
The Participants list shows all individuals that were enrolled in the course during the semester.
 Anyone that is currently enrolled in the course.
 Students that have withdrawn from the course during the semester. These students will no longer have access to the course but appear as suspended in the participants list.
 Last access to course will identify when the student last opened the course module.

Participant Filter
Instructors can change the view of participants in the course by using a filter. This allows the instructor to refine the list to a subset of participants based on specific criteria. There are two methods for filtering the list of participants:
- select from pre-defined options such as keyword, role, and status
- add additional conditions
The participants filter can be set up either by only selecting from the pre-defined filter options, or by using a combination of both methods (a pre-defined filter option and additional conditions).

To Add a Participant Filter
- Indicate who should be displayed in the list of participants by selecting an option from the Match drop-down list: match none of the criteria, any of the criteria, or all of the criteria.

- Select one of the filter options provided in the drop-down list.

- A new drop-down list will appear to the right of the pre-defined filter option just selected. The options available in the new drop-down list will be based on that pre-defined filter option. Select the appropriate option.
- If that is all the criteria required for filtering the participants list, click on the Apply filters button to display the filtered list. If additional conditions are required, proceed with the next steps.
- Add additional conditions by clicking on the Add condition button.

- Create the next filter using selections from the Match field and the two drop-down lists that appear. This is the same process that was used to create the first filter.

- Additional filters can be added by clicking on the Add condition button and making the appropriate selections from the Match field and two drop-down lists.
- Click on the Apply filter button to display the filtered list.
To Remove a Participants Filter
- To remove all filters, click on the Clear filters button.

- To remove individual filters, click on the X at the right end of that filter’s row.